

Using a Snowflake Connection
Once you have set up a Snowflake connection, you can use it to bring Snowflake data into Nexadata (Datasets) or send transformed data back to Snowflake (Outputs). This article walks through each option step by step. Both work the same way with an OAuth or a Key-pair connection.
Here are the key capabilities:
-
Create Datasets from a SQL statement that runs on a Snowflake warehouse you choose, so you can filter, join, and aggregate before the data moves
-
Amounts stored as
NUMBERwith decimals arrive in Nexadata as numbers with the same decimal precision, with no setup -
Write Workflow outputs to a Snowflake table with Append, Upsert, or Overwrite
-
Optionally create the target table and allow new columns as your outputs evolve
-
Every written row is stamped with the Nexadata run ID in a
NEXADATA_RUN_IDcolumn, so you can trace any row back to the run that wrote it
Part 1: Creating a Dataset from a SQL Statement
Section titled “Part 1: Creating a Dataset from a SQL Statement”A Snowflake Dataset always reads the results of a SQL statement. There is no table browser and no Data Format setting: the statement decides exactly which rows and columns come in.
Step 1: Create a New Dataset
Section titled “Step 1: Create a New Dataset”-
Navigate to the Datasets section in Nexadata.
-
Click Create Dataset.
-
Enter a unique Name for the Dataset.
-
Under Data Connection, select your Snowflake connection.
Step 2: Choose a Warehouse
Section titled “Step 2: Choose a Warehouse”Under Warehouse, start typing to search, then select the warehouse the statement should run on. The list shows the warehouses the connection’s role can see in Snowflake.
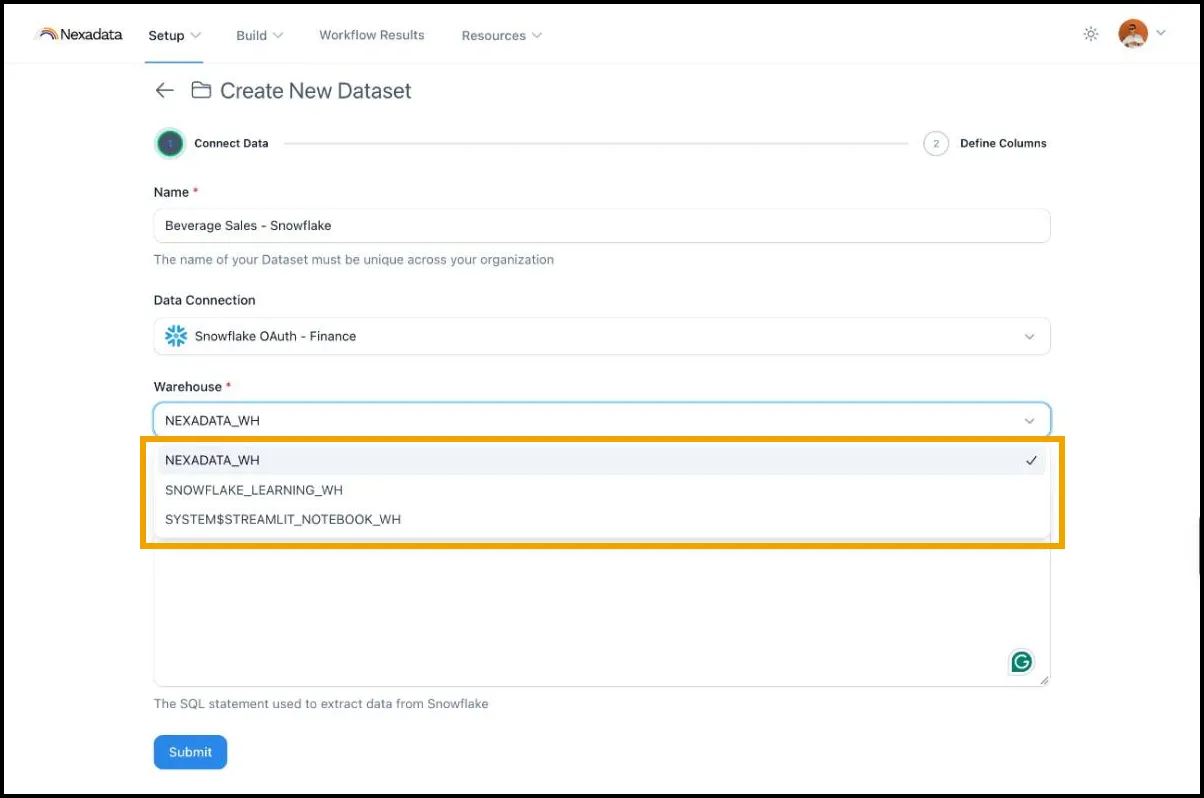
Step 3: Write Your SQL Statement
Section titled “Step 3: Write Your SQL Statement”Enter the statement that defines the Dataset in SQL Statement. Use fully qualified table names in the form DATABASE.SCHEMA.TABLE, since no database or schema is preselected. For example, with your own database and schema in place of FINANCE.ACTUALS:
SELECT REGION, PRODUCT_LINE, FISCAL_MONTH, SUM(NET_REVENUE) AS NET_REVENUEFROM FINANCE.ACTUALS.GL_REVENUEWHERE FISCAL_YEAR = 2026GROUP BY REGION, PRODUCT_LINE, FISCAL_MONTHSnowflake stores unquoted names in uppercase, so finance.actuals.gl_revenue and FINANCE.ACTUALS.GL_REVENUE refer to the same table. A name created in double quotes with lowercase letters or spaces must be written in double quotes, exactly as created.
The connection’s role needs USAGE on the database and schema, and SELECT on every table or view the statement reads. See Setting up a Snowflake Connection.
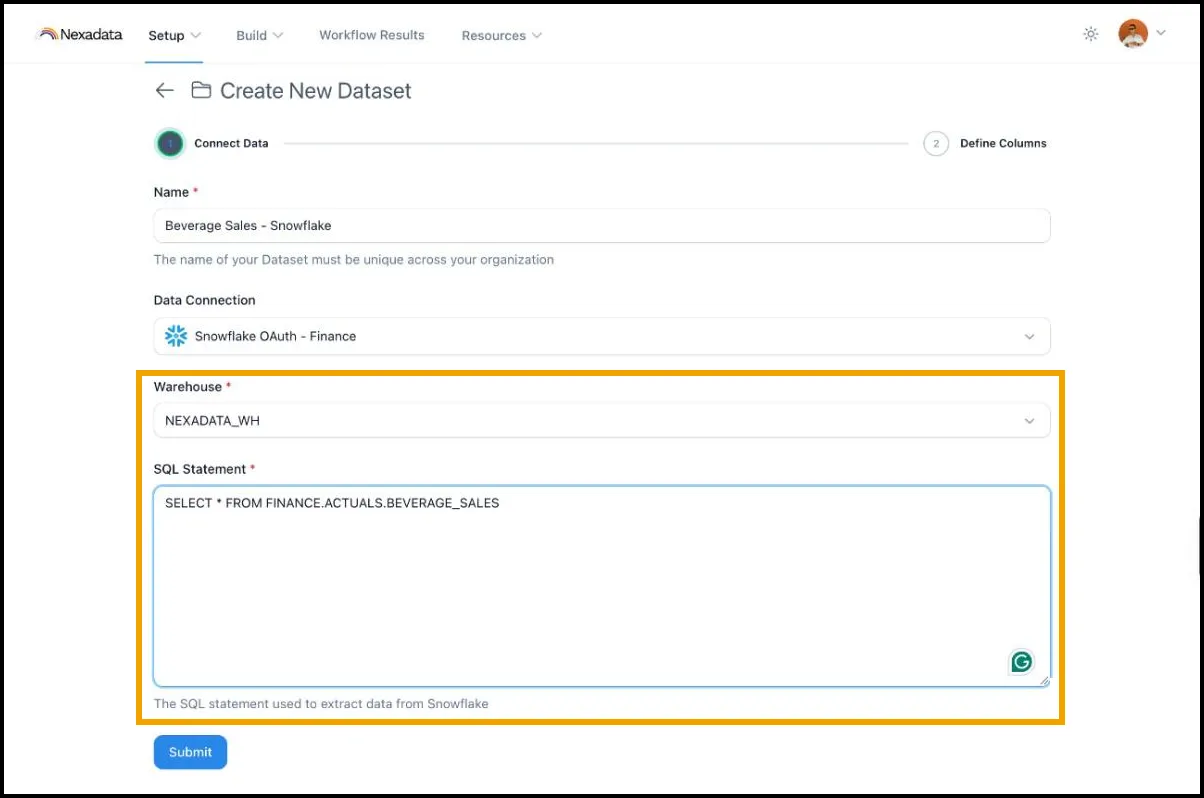
Step 4: Submit and Define Columns
Section titled “Step 4: Submit and Define Columns”-
Click Submit. Nexadata runs the statement on the warehouse. If the warehouse is suspended, Snowflake resumes it first, which usually takes a few seconds.
-
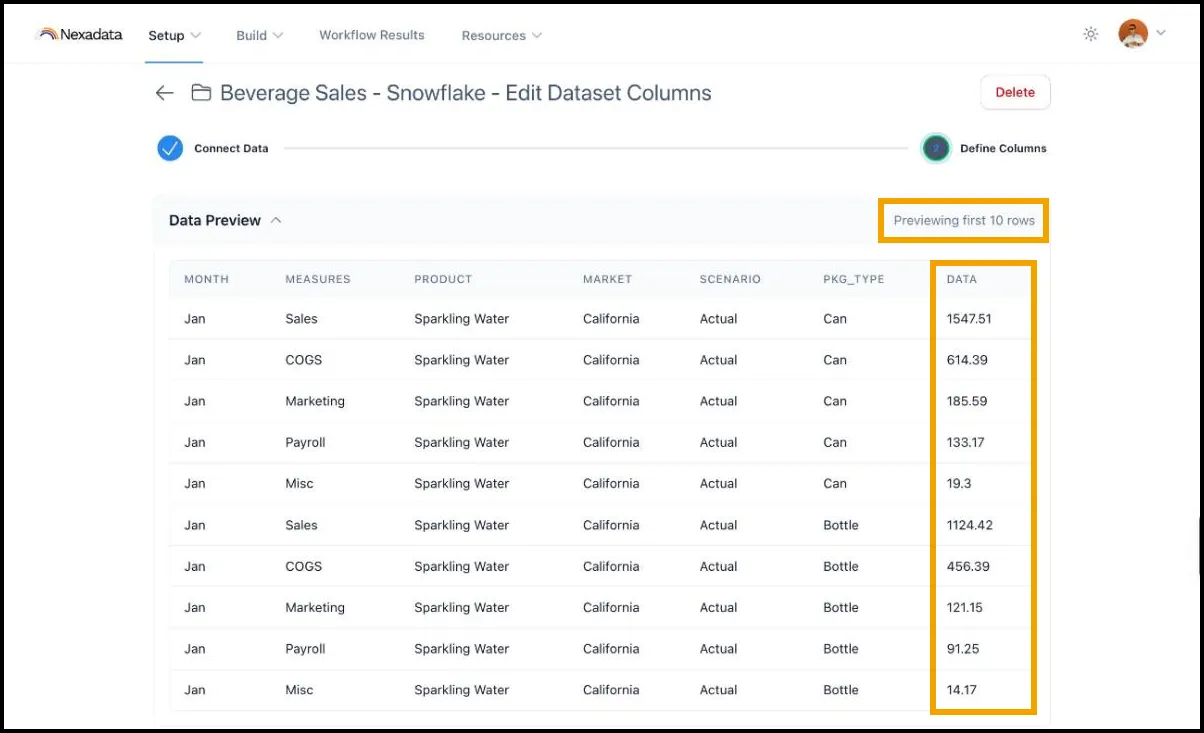
On Define Columns, the Data Preview shows the first 10 rows the statement returned.
-
Review the column types and save, as for any Dataset. See How to Create a New Nexadata Dataset. A column stored in Snowflake as
NUMBERwith a scale, such asNUMBER(18,2), comes in as Number with Decimal Precision set to match, here2.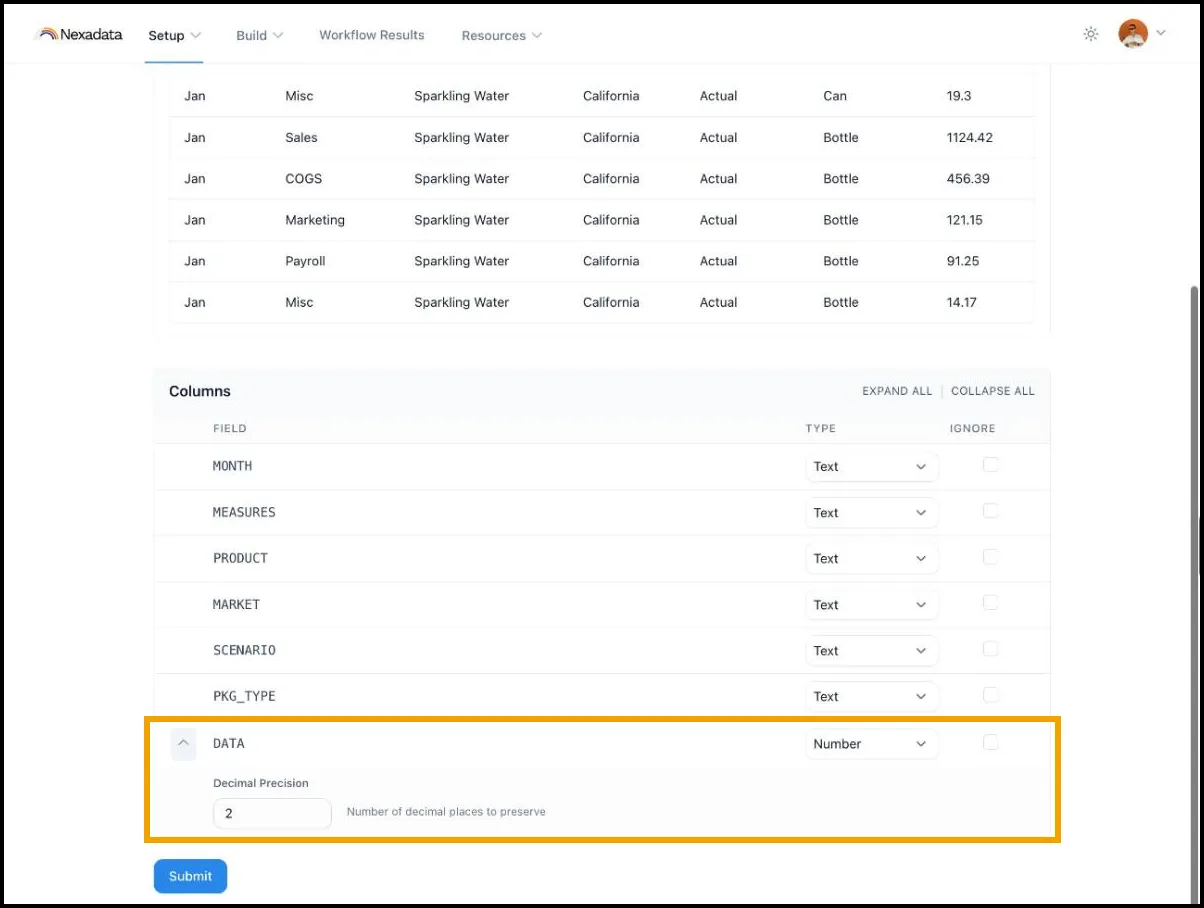
Part 2: Sending Data Back to Snowflake
Section titled “Part 2: Sending Data Back to Snowflake”Nexadata uploads each run’s rows to a temporary internal stage in Snowflake and loads them into the target table. You do not need a stage, a storage bucket, or a volume of your own.
Step 1: Add an Output
Section titled “Step 1: Add an Output”-
Open the Workflow that produces the data you want to write, and go to its Outputs tab. See Workflow Outputs.
-
Add an output and enter a Name for it.
-
Click Customize Outputs, then under Data Connection to use, select your Snowflake connection. The Snowflake settings appear below.
Step 2: Choose the Warehouse and Target Table
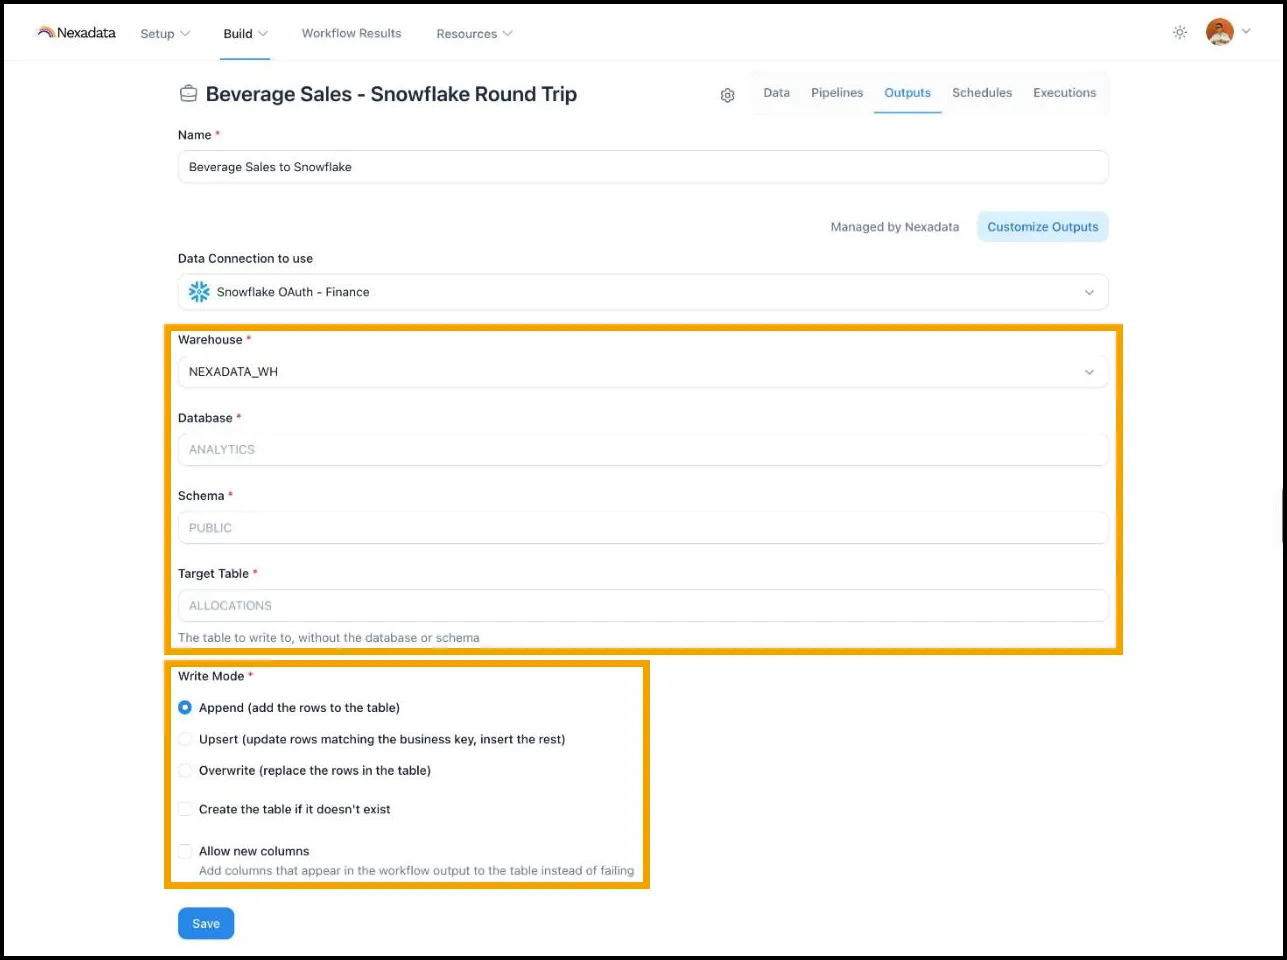
Section titled “Step 2: Choose the Warehouse and Target Table”The target table is entered in three separate fields:
-
Warehouse: The warehouse that runs the load.
-
Database: The database that holds the table, for example
FINANCE. -
Schema: The schema that holds the table, for example
PLANNING. -
Target Table: The table name only, without the database or schema, for example
BEVERAGE_SALES.
Step 3: Choose a Write Mode
Section titled “Step 3: Choose a Write Mode”-
Append (add the rows to the table): Adds every row to the table on each run. This is the default.
-
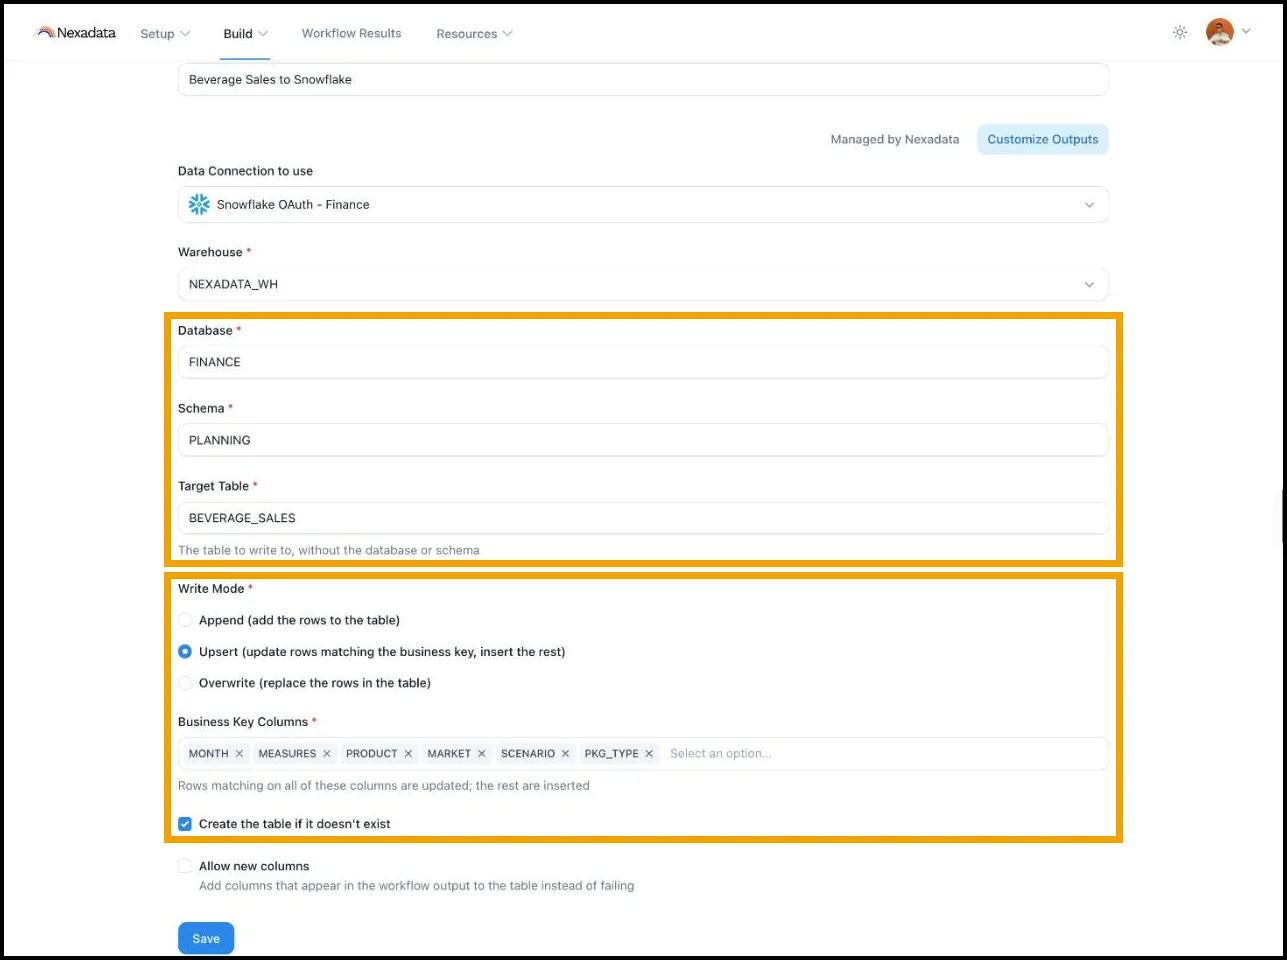
Upsert (update rows matching the business key, insert the rest): Under Business Key Columns, select the columns that together identify a row, for example
MONTH,MEASURES,PRODUCT,MARKET,SCENARIO, andPKG_TYPE. Rows that match the table on all of these columns are updated; the rest are inserted. -
Overwrite (replace the rows in the table): Removes every row from the table, then loads the run. The table itself, its columns, and its grants stay as they are.
Step 4: Set Optional Behaviors
Section titled “Step 4: Set Optional Behaviors”Both settings are off by default.
-
Create the table if it doesn’t exist: Nexadata creates the target table with the output’s column types before the first load. The connection’s role owns the new table.
-
Allow new columns: If the Workflow output has a column the table does not, Nexadata adds it to the table instead of failing the run.
A completed output, upserting into FINANCE.PLANNING.BEVERAGE_SALES and creating the table on the first run, looks like this:
Step 5: Save and Run
Section titled “Step 5: Save and Run”Save the output and run the Workflow. Nexadata writes the results to the table according to your settings.
How Nexadata Writes to Snowflake
Section titled “How Nexadata Writes to Snowflake”-
Amounts keep their precision. A Number column with two decimal places is created in Snowflake as
NUMBER(38,2), so totals in Snowflake tie to the source to the cent. The Workflow’s Output Schema shows such a column with the number icon (#). -
Column names stay exactly as you named them. When Nexadata creates the table, each column gets the name shown in the Output Schema, case included, so the names in Snowflake match the names your team already uses. Uppercase names such as
AMOUNTwork in SQL as written. Names with lowercase letters, such asproduct_sku, are case-sensitive in Snowflake, so SQL must write them in double quotes, as"product_sku". Without the quotes, Snowflake reads the name as uppercase and the query fails withinvalid identifier 'PRODUCT_SKU'.NEXADATA_RUN_IDis always uppercase. If you’d rather query without quotes, name the columns in uppercase in the Pipeline before the first run creates the table. -
Run traceability. Nexadata adds a
NEXADATA_RUN_IDcolumn to the target table if it is not already there, and stamps every row it writes with the ID of the Workflow run. With Upsert, every row the run matches on the business key gets the new run ID, even if its values did not change. The run ID shows which run last wrote a row; to see which values changed, compare the amounts. -
Upsert updates rows in place. An upsert loads the run into a temporary table named
<TABLE>_nexadata_stagingin the target schema, then merges it into the target on the business key. Running the same Workflow twice leaves the same number of rows, not twice as many. The temporary table lasts only as long as the load and is dropped automatically. -
Overwrite clears earlier runs. After an Overwrite, the table holds only the latest run’s rows.
-
Column mismatches stop the run. With Allow new columns off, if the Workflow output and the table do not have the same columns, the run fails before anything is written, and the error names the columns on each side. Nothing is half-loaded.
Tips and Best Practices
Section titled “Tips and Best Practices”-
Push work to the warehouse. Filter and aggregate in the SQL statement so only the rows you need move into Nexadata.
-
Use Upsert for recurring loads. Plan versions and allocations that are restated each cycle should upsert on a business key rather than append.
-
Use a small warehouse with auto-suspend. An X-Small warehouse that suspends after 60 seconds is enough for most planning loads and costs nothing while idle.
-
Run once against a test schema. Since table and permission problems surface at run time, point a new output at a sandbox schema first.