

Natural Language Input vs. Advanced Mode in Nexadata Pipelines
When setting up Nexadata Pipelines, you have two options for defining transformations: Natural Language Input and Advanced Mode. Both offer powerful ways to configure your pipelines, but they cater to different use cases depending on the level of control and precision you need.
Natural Language Input
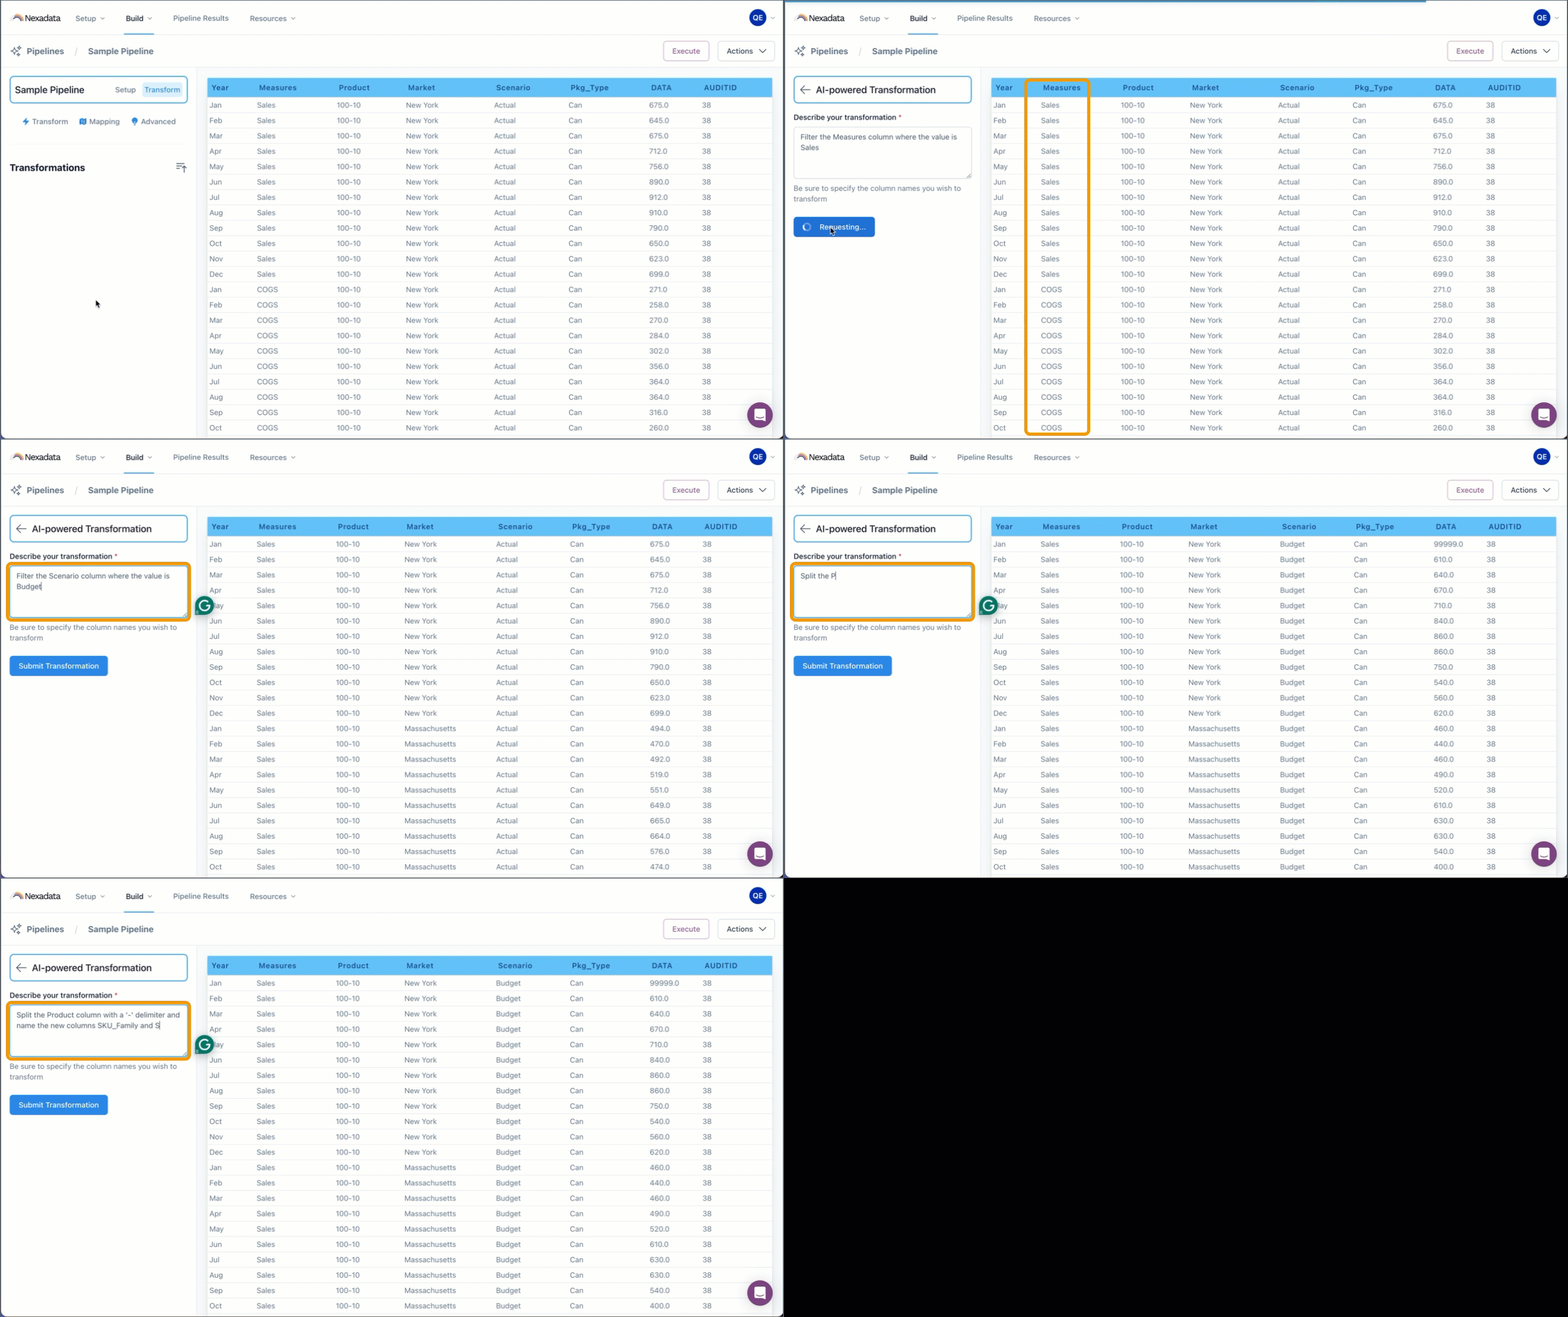
Section titled “Natural Language Input”Natural Language Input allows you to define transformation steps by simply describing the operation you’d like to perform in plain language. This mode is ideal for users who:
-
Want to set up basic transformations quickly.
-
Prefer a more intuitive, conversational approach to configuring pipelines.
-
Are less familiar with the technical details of data transformations.
When to Use Natural Language Input
Section titled “When to Use Natural Language Input”-
Quick setup: If you need to apply straightforward transformations (e.g., filtering data or sorting columns), Natural Language Input is the fastest way to build your pipeline.
-
Early prototyping: For initial drafts or experimentation with your dataset, describing the desired transformations in natural language can save time.
Example
Section titled “Example”- Typing “Filter records where the value is greater than 100” will automatically set up a filter transformation based on your description.
Advanced Mode
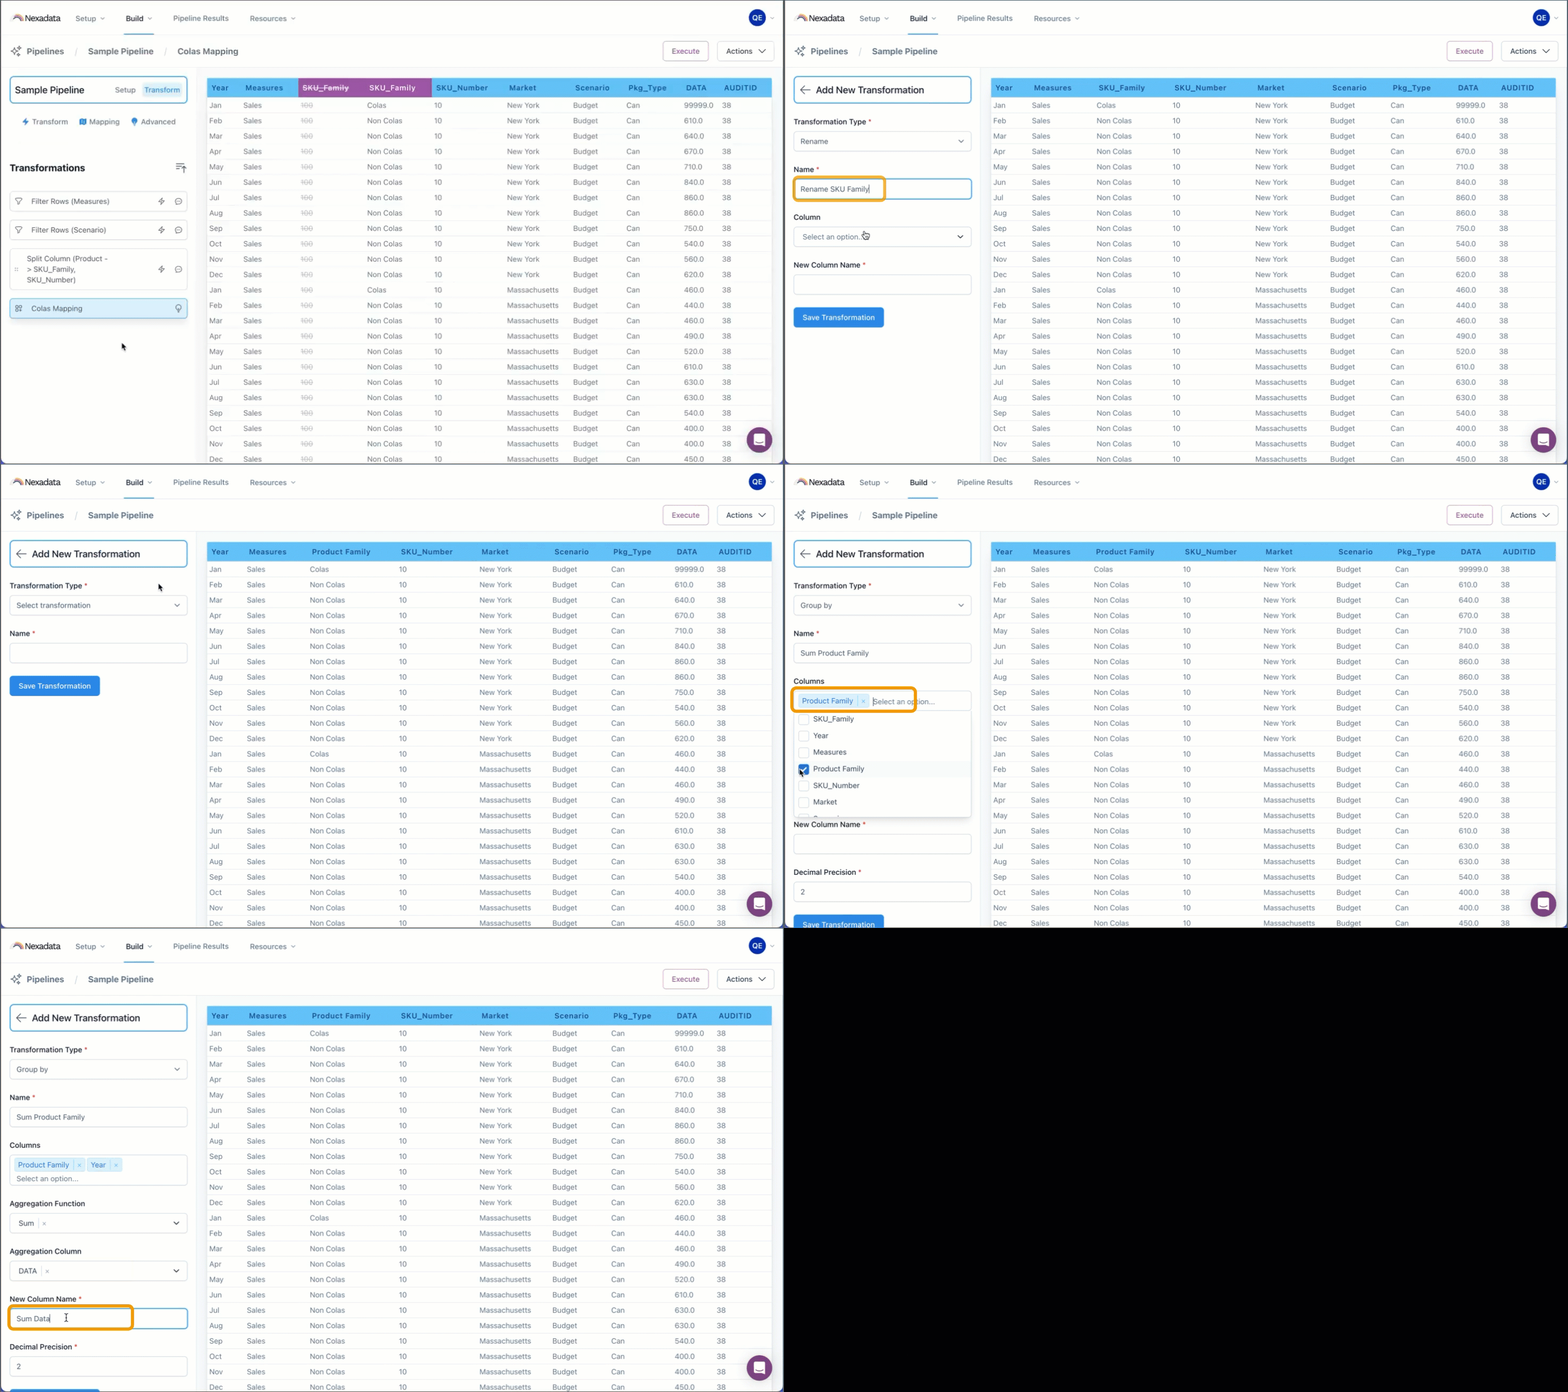
Section titled “Advanced Mode”Advanced Mode provides a more detailed and precise way to configure each transformation step through an intuitive UI. This mode is designed for users who:
-
Need full control over each transformation.
-
Are working on more complex workflows with specific customization needs.
-
Prefer to manually adjust settings, view detailed parameters, or tweak advanced options.
When to Use Advanced Mode
Section titled “When to Use Advanced Mode”-
Complex transformations: If your pipeline involves multiple steps, joins, or calculations, Advanced Mode ensures that each detail is configured exactly as needed.
-
Fine-tuning: When the Natural Language Input doesn’t produce the expected result, you can use Advanced Mode to edit the step.
-
Editing existing pipelines: Advanced Mode allows you to go back and modify previously defined transformations for further customization.
Example
Section titled “Example”- In Advanced Mode, you can manually select a dataset, define precise filter conditions, set sorting parameters, and configure complex joins across multiple datasets.
Visual Cues in Nexadata Pipelines
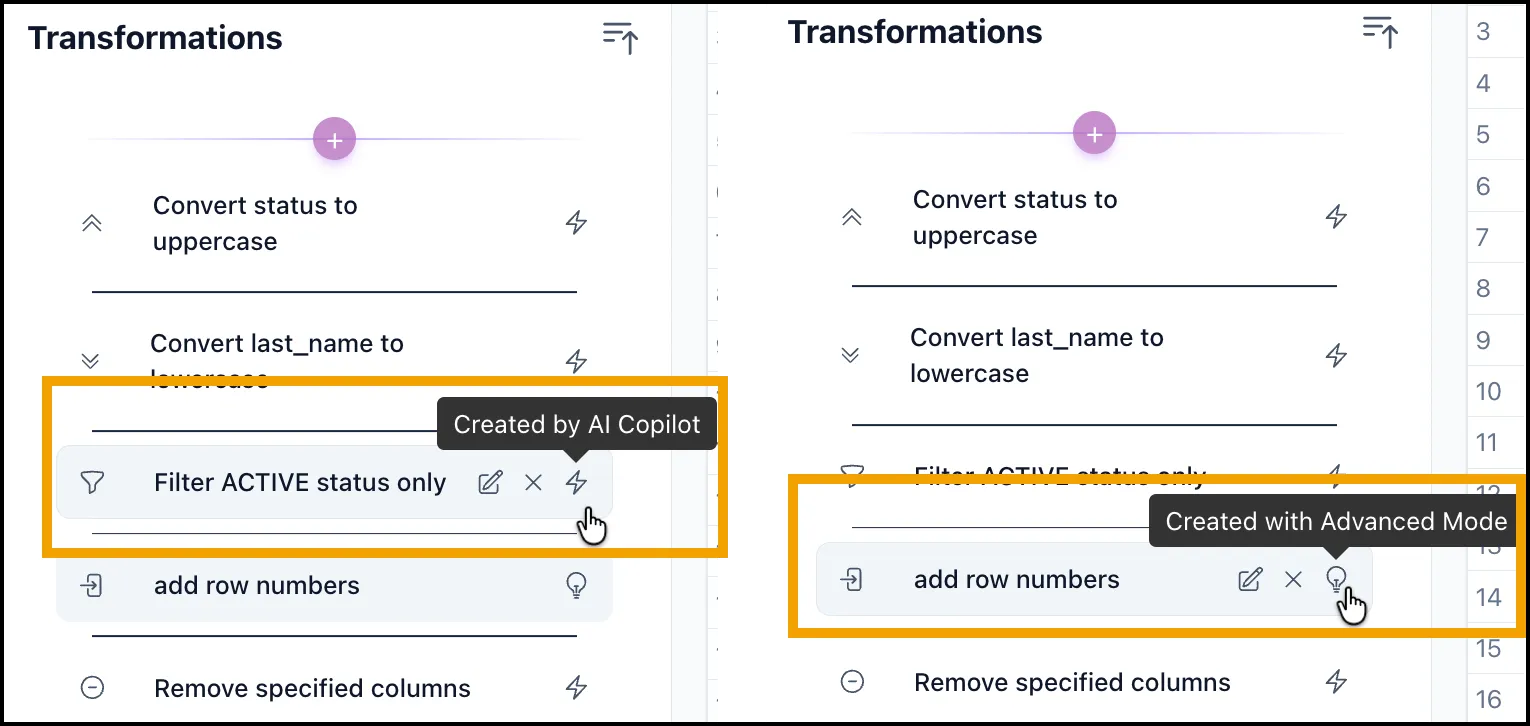
Section titled “Visual Cues in Nexadata Pipelines”As you build your pipeline, you can easily tell which mode was used for each step:
-
Natural Language Input steps are marked with a lightning bolt icon ⚡. Hover over the icon to view the exact natural language prompt used.
-
Advanced Mode steps are marked with a lightbulb icon 💡, indicating that the transformation was manually configured.
Key Differences: Natural Language Input vs. Advanced Mode
Section titled “Key Differences: Natural Language Input vs. Advanced Mode”| Feature | Natural Language Input | Advanced Mode |
|---|---|---|
| Ease of Use | Best for quick, straightforward setup | Best for full control and precision |
| Control | Limited control over configuration details | Complete control with detailed configuration options |
| Complexity | Ideal for simple transformations | Best for complex workflows with multiple steps |
| Editing | Can switch to Advanced Mode for adjustments | Allows full editing of all parameters |
| Speed | Faster for simple tasks | More time-consuming but provides detailed customization |
| Visual Cue | Lightning bolt icon ⚡ | Lightbulb icon 💡 |
Conclusion: Which Mode to Choose?
Section titled “Conclusion: Which Mode to Choose?”-
Use Natural Language Input to quickly set up a pipeline with basic transformations. This is especially useful for early stages of prototyping or simple data workflows.
-
Switch to Advanced Mode when you need fine-grained control over each transformation step or when you are working on complex pipelines that require detailed configuration.
Both modes provide flexibility, allowing you to smoothly switch between them to make sure your pipeline fulfills your specific requirements.