

Use Case: Round Trip Between Snowflake and Nexadata
The quickest way to prove a Snowflake connection end to end is a round trip: read a table from Snowflake into Nexadata, run it through a Workflow, write the result back to Snowflake, and check that the totals match. This use case walks through that round trip with Beverage Sales, a sample planning fact table that Nexadata provides, but any table of your own works the same way. It works with either an OAuth or a Key-pair connection.
By the end, you will have:
-
A Nexadata Dataset that reads from Snowflake with a SQL statement
-
A Workflow with a visible Pipeline step that writes its output to a new Snowflake table
-
Proof that every row arrived and the amounts tie to the cent
-
Proof that rerunning the Workflow does not duplicate rows
Part 1: Set Up Snowflake
Section titled “Part 1: Set Up Snowflake”This example uses one database with two schemas: one Nexadata reads from, and one it writes to. Your names can differ. If they do, use them wherever this guide says FINANCE, ACTUALS, or PLANNING, including in the SQL and the output settings.
| Object | Purpose | Privileges for the Nexadata role |
|---|---|---|
FINANCE | Database | USAGE |
FINANCE.ACTUALS | Source data, read by Nexadata | USAGE, SELECT on all and future tables |
FINANCE.PLANNING | Results, written by Nexadata | USAGE, CREATE TABLE, CREATE STAGE, table write privileges, OWNERSHIP on future tables |
Splitting read and write this way keeps Nexadata’s access to your source data read-only. See Setting up a Snowflake Connection for how to create the role and the connection, and for the exact grant statements.
Step 1: Create the Database and Schemas
Section titled “Step 1: Create the Database and Schemas”In a Snowsight worksheet, run:
USE ROLE SYSADMIN;CREATE DATABASE IF NOT EXISTS FINANCE;CREATE SCHEMA IF NOT EXISTS FINANCE.ACTUALS;CREATE SCHEMA IF NOT EXISTS FINANCE.PLANNING;Then run the grants from Part 2, Step 1 of the setup guide with <DATABASE> set to FINANCE, <SOURCE_SCHEMA> set to ACTUALS, and <TARGET_SCHEMA> set to PLANNING.
Step 2: Load the Source Table
Section titled “Step 2: Load the Source Table”-
Download beverage-sales-fact.csv (1.4 MB). It holds the Beverage Sales fact table, generated sample data for a beverage company: 28,800 rows with the columns
month,measures,product,market,scenario,pkg_type, anddata. -
In Snowsight, open Ingestion → Add data, choose Load data into a Table, and select
beverage-sales-fact.csv. Load it into a new tableFINANCE.ACTUALS.BEVERAGE_SALES_RAWon your warehouse. -
Before you click Load, check the column names under Edit Schema. By default, Snowflake treats the header line as data: the columns are named
c1toc7, and every column isVARCHAR.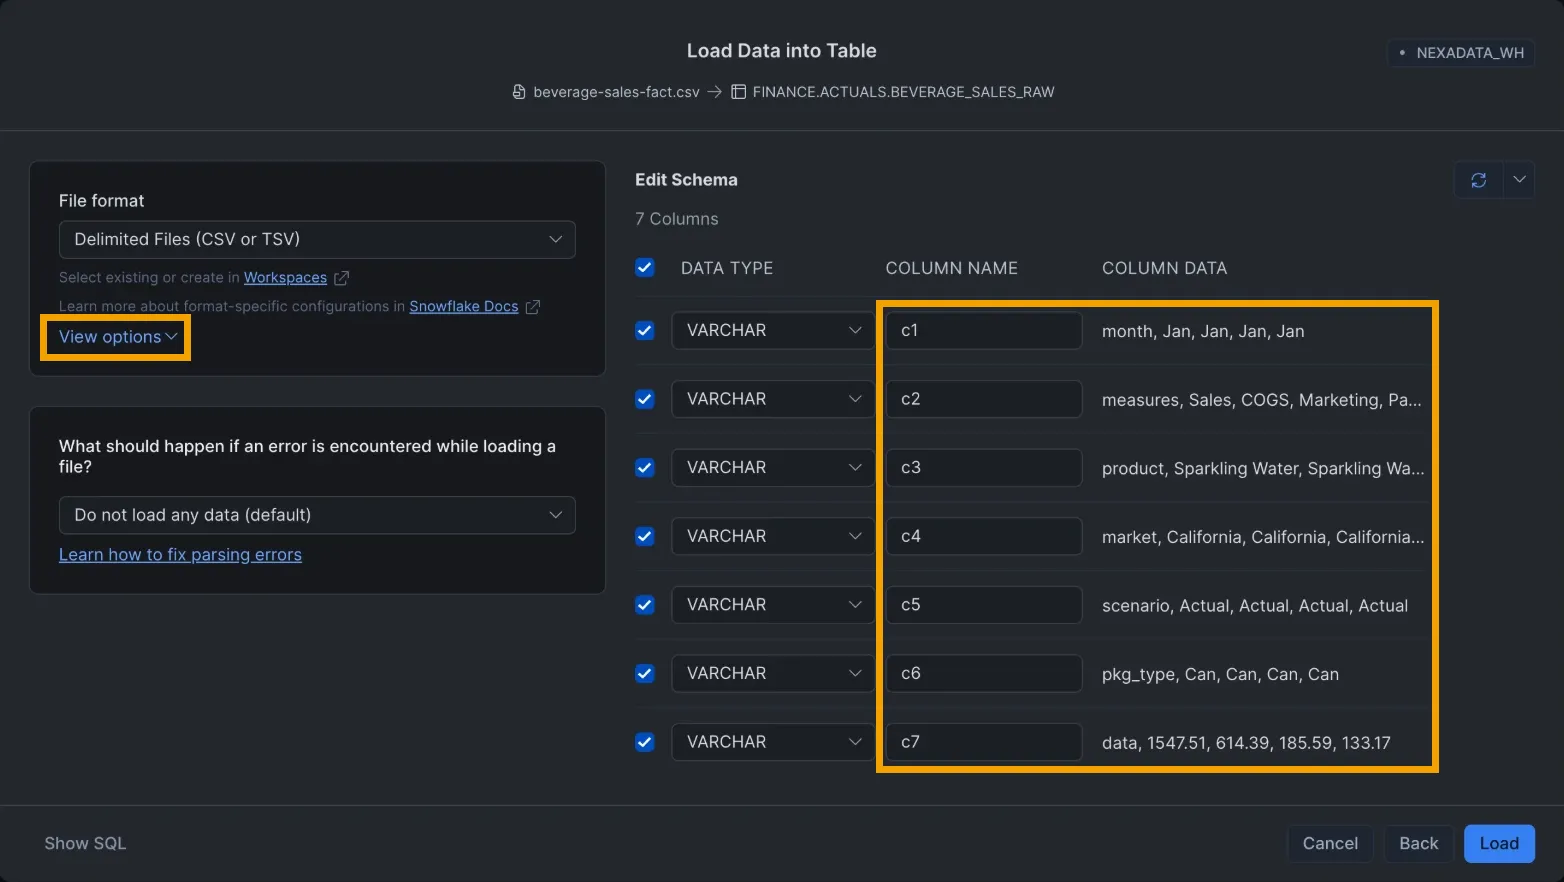
Click View options under File format and set Header to First line contains header. The columns are then named
monthtodata, anddatais detected asNUMBER. Click Load.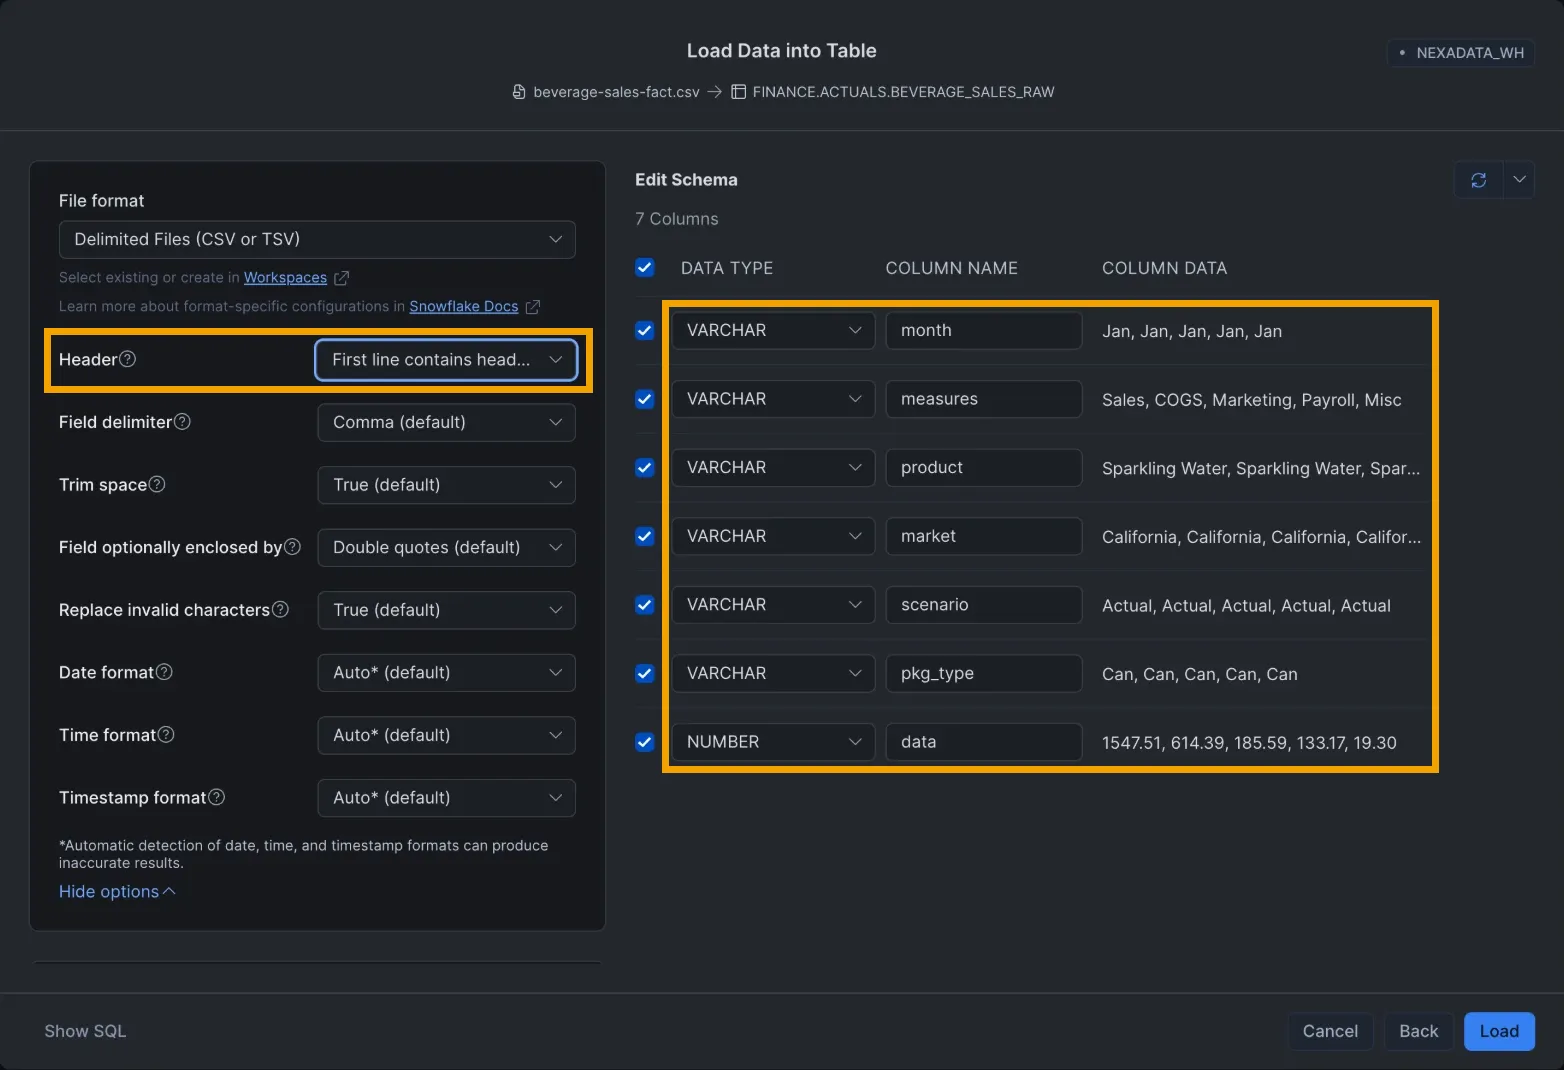
-
In a worksheet, copy the table and store the amount as an exact decimal:
CREATE OR REPLACE TABLE FINANCE.ACTUALS.BEVERAGE_SALES ASSELECT MONTH, MEASURES, PRODUCT, MARKET, SCENARIO, PKG_TYPE,       CAST(DATA AS NUMBER(18,2)) AS DATAFROM FINANCE.ACTUALS.BEVERAGE_SALES_RAW;
DROP TABLE FINANCE.ACTUALS.BEVERAGE_SALES_RAW;Step 3: Record the Source Totals
Section titled “Step 3: Record the Source Totals”SELECT COUNT(*) AS ROW_COUNT, SUM(DATA) AS TOTALFROM FINANCE.ACTUALS.BEVERAGE_SALES;For Beverage Sales, this returns 28,800 rows totalling 5,613,357.84. Keep these numbers; you will compare against them at the end.
Part 2: Read the Table into Nexadata
Section titled “Part 2: Read the Table into Nexadata”-
Create a Snowflake connection with OAuth or Key-pair. See Setting up a Snowflake Connection.
-
Create a Dataset from that connection. Choose your Warehouse and enter this SQL Statement:
SELECT * FROM FINANCE.ACTUALS.BEVERAGE_SALES- Click Submit. On Define Columns, you should see the seven columns, with
DATAas Number and a Decimal Precision of2. Save the Dataset.
See Using a Snowflake Connection for the Dataset options in detail.
Part 3: Write the Results Back to Snowflake
Section titled “Part 3: Write the Results Back to Snowflake”Step 1: Create the Workflow and Pipeline
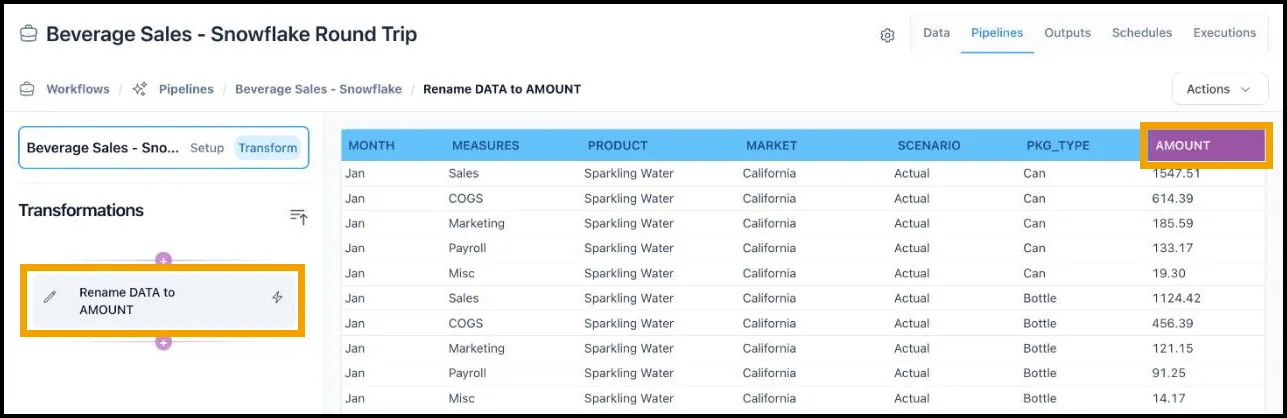
Section titled “Step 1: Create the Workflow and Pipeline”Create a Workflow that uses the Dataset. See Creating Nexadata Workflows. An output writes what a Pipeline produces, so add a Pipeline on the Dataset with one transformation: Rename the column DATA to AMOUNT. The rename keeps every row and every amount, so the totals stay checkable, and it shows plainly in Snowflake that the data passed through Nexadata. In practice, this is where your transformations and mappings go.
Step 2: Add the Snowflake Output
Section titled “Step 2: Add the Snowflake Output”Add an output and select your Snowflake connection. Set:
-
Warehouse: The same warehouse as the Dataset.
-
Database:
FINANCE -
Schema:
PLANNING -
Target Table:
BEVERAGE_SALES -
Write Mode: Upsert, with Business Key Columns
MONTH,MEASURES,PRODUCT,MARKET,SCENARIO, andPKG_TYPE. -
Create the table if it doesn’t exist: On.
Step 3: Run the Workflow
Section titled “Step 3: Run the Workflow”Save the output and run the Workflow. When it finishes, the output is listed with the status Success.

Part 4: Confirm the Round Trip
Section titled “Part 4: Confirm the Round Trip”Check the Totals and the Run ID
Section titled “Check the Totals and the Run ID”In a Snowsight worksheet, run:
SELECT NEXADATA_RUN_ID, COUNT(*), COUNT(AMOUNT), SUM(AMOUNT)FROM FINANCE.PLANNING.BEVERAGE_SALESGROUP BY 1;The result is one row: one NEXADATA_RUN_ID, the ID of the Workflow run that wrote the table, with 28,800 rows, 28,800 amounts, and a total of 5,613,357.84. Matching the source to the cent confirms that every amount was written as an exact decimal. Nexadata created AMOUNT as NUMBER(38,2).

Run It Again
Section titled “Run It Again”Run the Workflow a second time, then repeat the query. The result is still one row with 28,800 rows and 5,613,357.84, now with the second run’s ID: Upsert matched every row on the business key and updated it in place rather than inserting a duplicate.
Optional: See Who Wrote the Rows
Section titled “Optional: See Who Wrote the Rows”Snowflake records every statement Nexadata runs under the connection’s user. For a Key-pair connection with the service user NEXADATA_SVC, this query lists the recent loads:
SELECT start_time, query_type, execution_status, rows_producedFROM TABLE(FINANCE.INFORMATION_SCHEMA.QUERY_HISTORY_BY_USER( USER_NAME => 'NEXADATA_SVC', RESULT_LIMIT => 20))WHERE query_type IN ('MERGE', 'INSERT', 'UPDATE')ORDER BY start_time DESC;Each Upsert run appears as one MERGE with rows_produced of 28,800. For an OAuth connection, use the name of the person who signed in. Two things to know when reading the result:
-
Use
rows_produced. This view has norows_insertedorrows_updatedcolumns. -
Snowflake shows times in Pacific time by default, while Nexadata shows your local time, so the same run can appear hours apart.
Where to Go Next
Section titled “Where to Go Next”Replace Beverage Sales with your own tables, add transformations and mappings to the Pipeline, and write the results to the schemas your planning teams use. If anything in the round trip fails, see Troubleshooting the Snowflake Connector.