

Troubleshooting the Snowflake Connector
If you encounter issues with your Snowflake connection in Nexadata, this guide will help you resolve the most common ones. Nexadata shows Snowflake’s own error message where one is available, so the text names the object or privilege involved. Most fixes are either re-authorizing the connection in Nexadata or a grant your Snowflake admin can run.
This guide is organized into three parts:
-
Connecting to Snowflake
-
Creating a Dataset
-
Sending Data Back to Snowflake
Part 1: Issues with Connecting to Snowflake
Section titled “Part 1: Issues with Connecting to Snowflake”Issue 1: OAuth Authorization Expired or Revoked
Section titled “Issue 1: OAuth Authorization Expired or Revoked”What you see: A Dataset that uses the connection shows “Invalid Credentials. Your Connection may need to be re-authorized. Click here to edit Connection.” A Workflow run fails with “The external service rejected the request because the credentials are not authorized (401 Unauthorized). Verify the Data Connection credentials and confirm the account still has access to the requested data.” The connection page shows “Snowflake authorization has expired. Re-authorize with Snowflake to continue.”
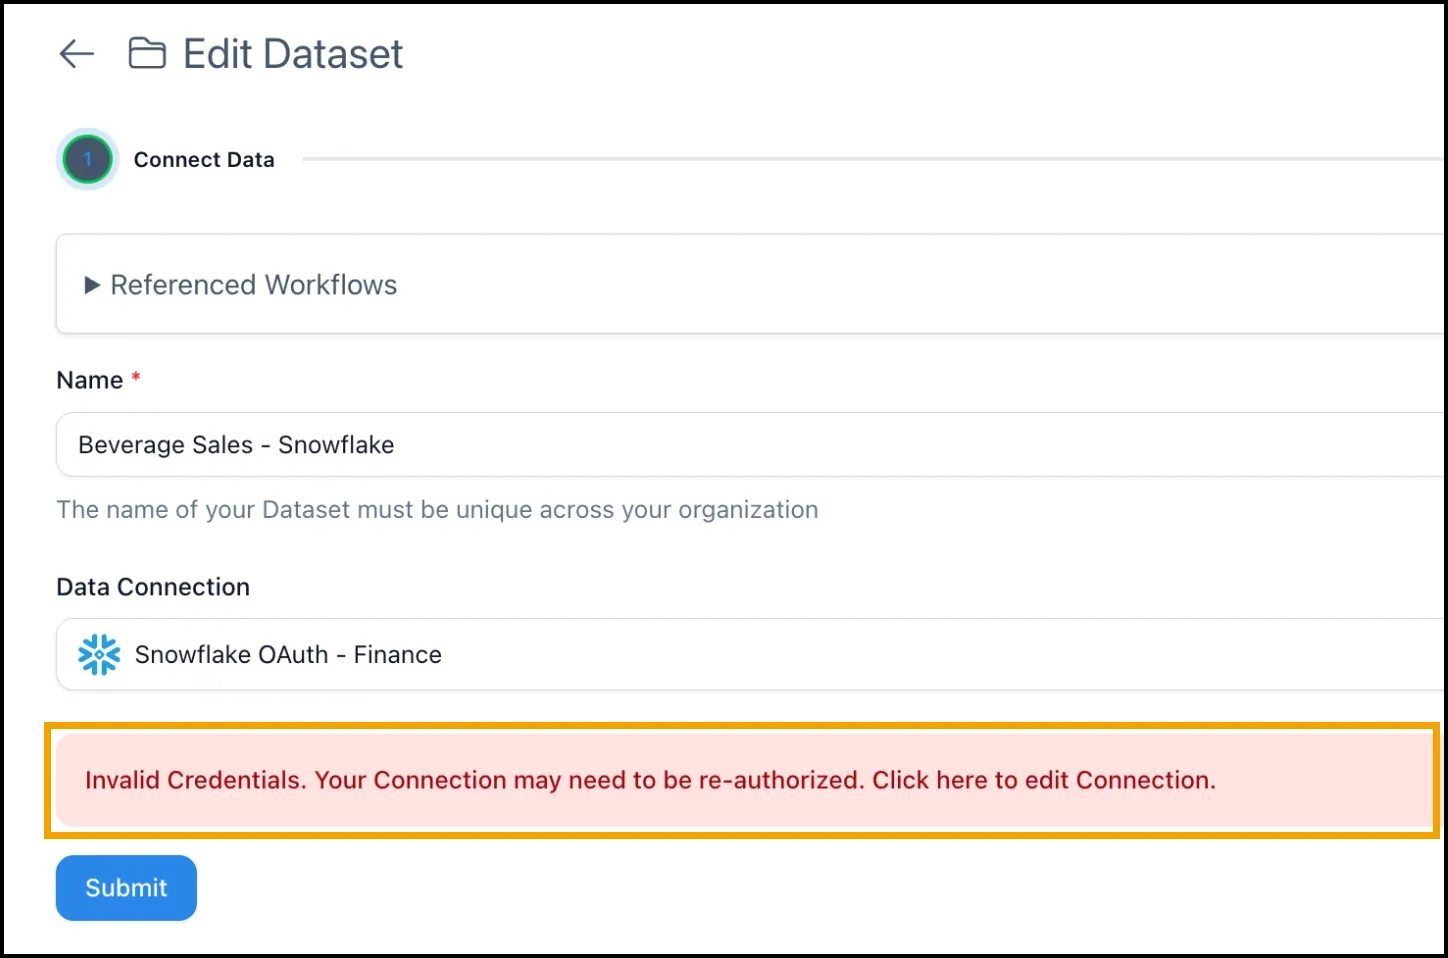
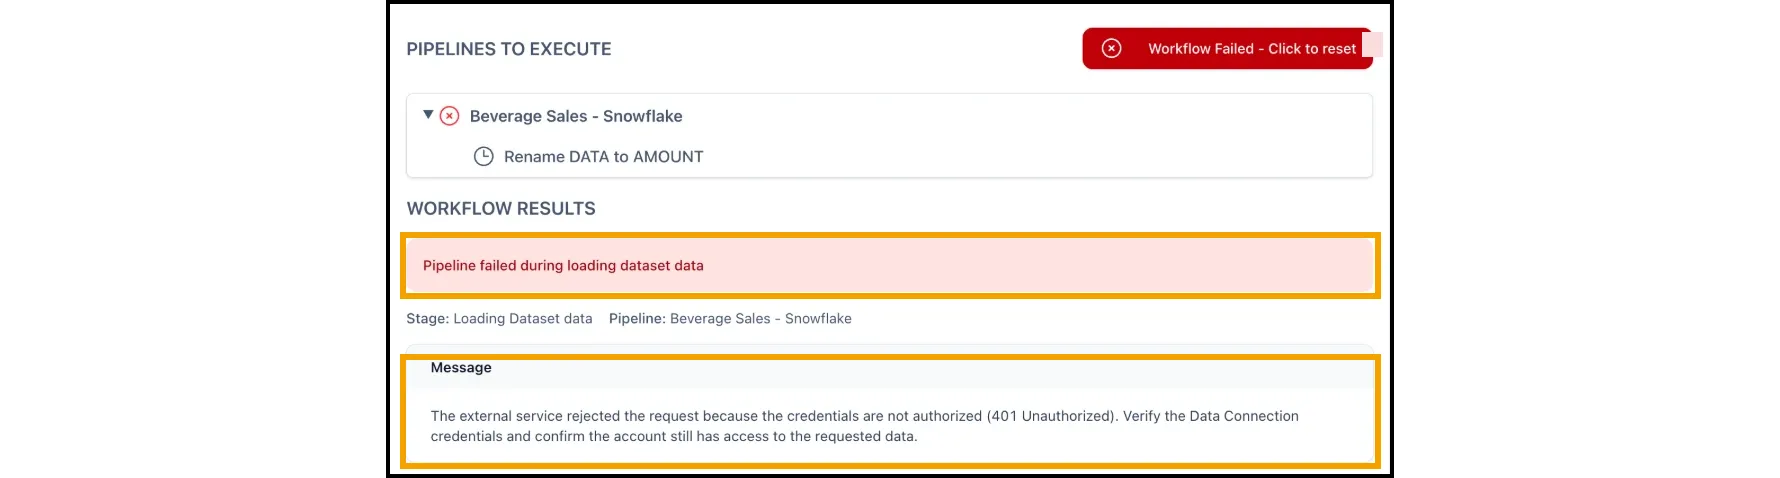
Cause: Snowflake no longer accepts the connection’s refresh token. Either it reached the integration’s OAUTH_REFRESH_TOKEN_VALIDITY (90 days with the settings in the setup guide), or someone revoked the person’s consent in Snowflake.
Fix:
-
Click the banner on the Dataset, or open the connection from Setup → Connections.
-
Click Re-authorize with Snowflake, sign in, and click Allow, as when you created the connection.
-
Click Submit to save the new tokens.
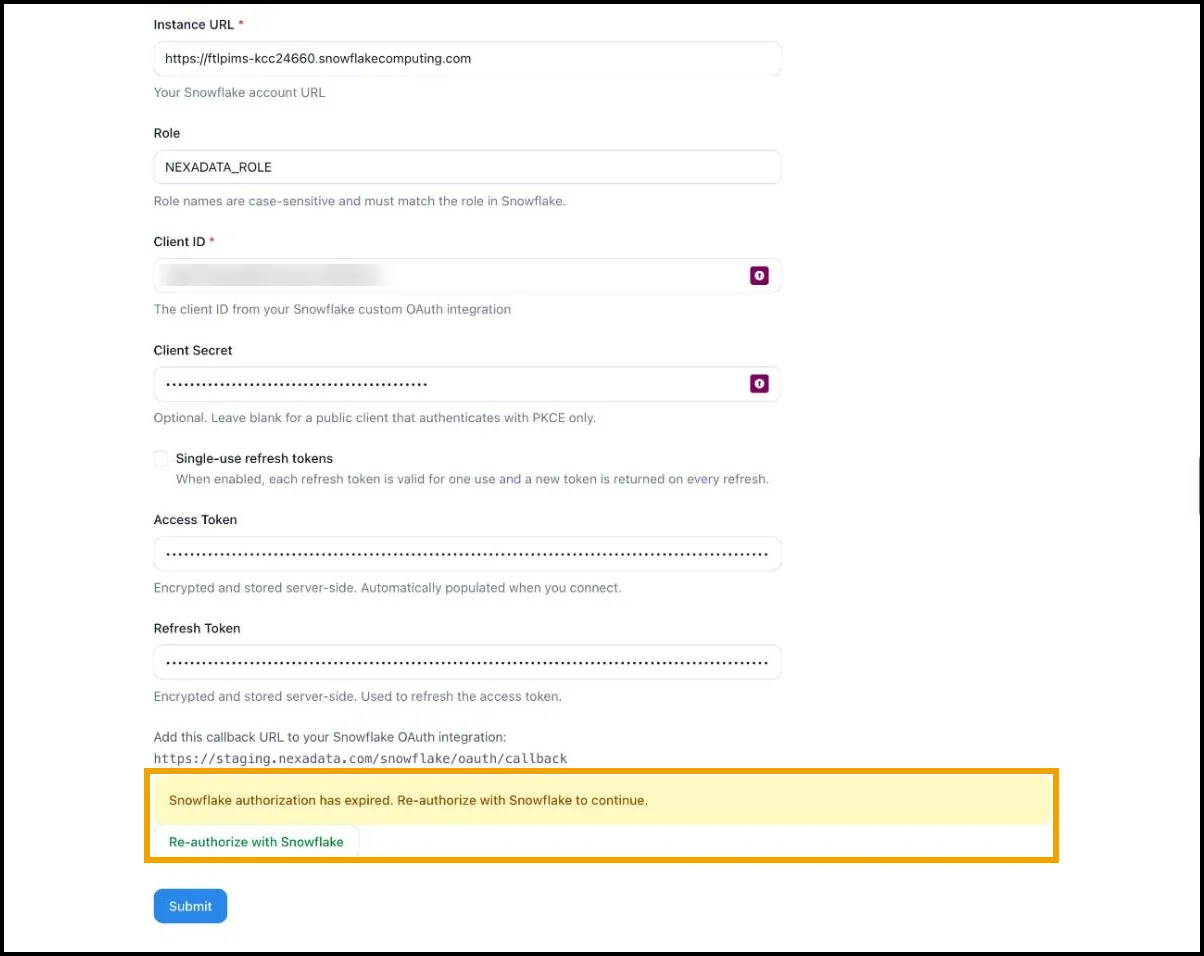
If this happens on a regular schedule, ask your Snowflake admin to check OAUTH_REFRESH_TOKEN_VALIDITY on the integration. A value of 86400 means one day, so every connection must be re-authorized daily.
Issue 2: OAuth Client Credentials Changed
Section titled “Issue 2: OAuth Client Credentials Changed”What you see: After you edit the Client ID or Client Secret on an OAuth connection, the form shows “Your OAuth client credentials changed after authorization. Re-authorize with Snowflake.”
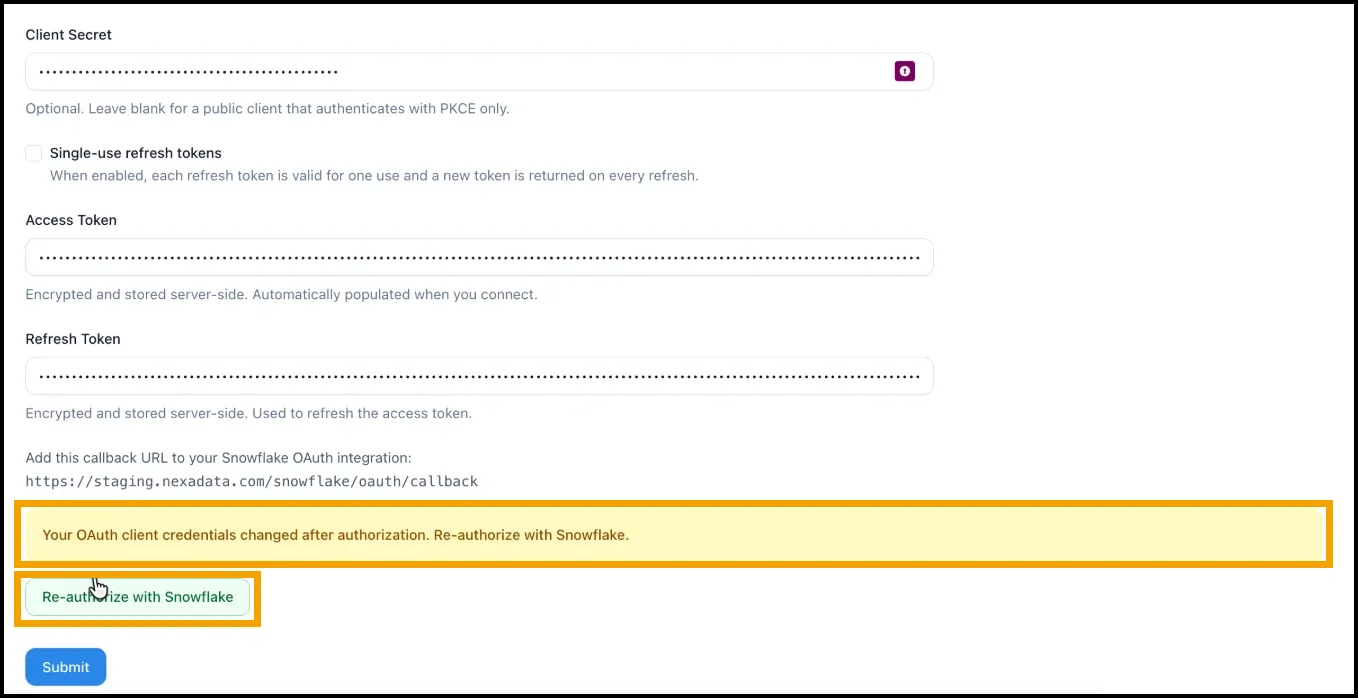
Cause: The saved tokens were issued for the old client credentials, so they cannot be used with the new ones.
Fix: If you meant to change them, click Re-authorize with Snowflake, approve access, then click Submit. If you did not, reload the page without saving to keep the connection as it was.
Issue 3: Key-pair Verify Credentials Fails
Section titled “Issue 3: Key-pair Verify Credentials Fails”What you see: Verify Credentials shows “Could not verify credentials. Confirm that you have entered details properly and that the proper access has been granted.” and a red X next to Submit. Clicking Submit shows “Verify the Snowflake key-pair credentials before submitting this connection.” and does not save.
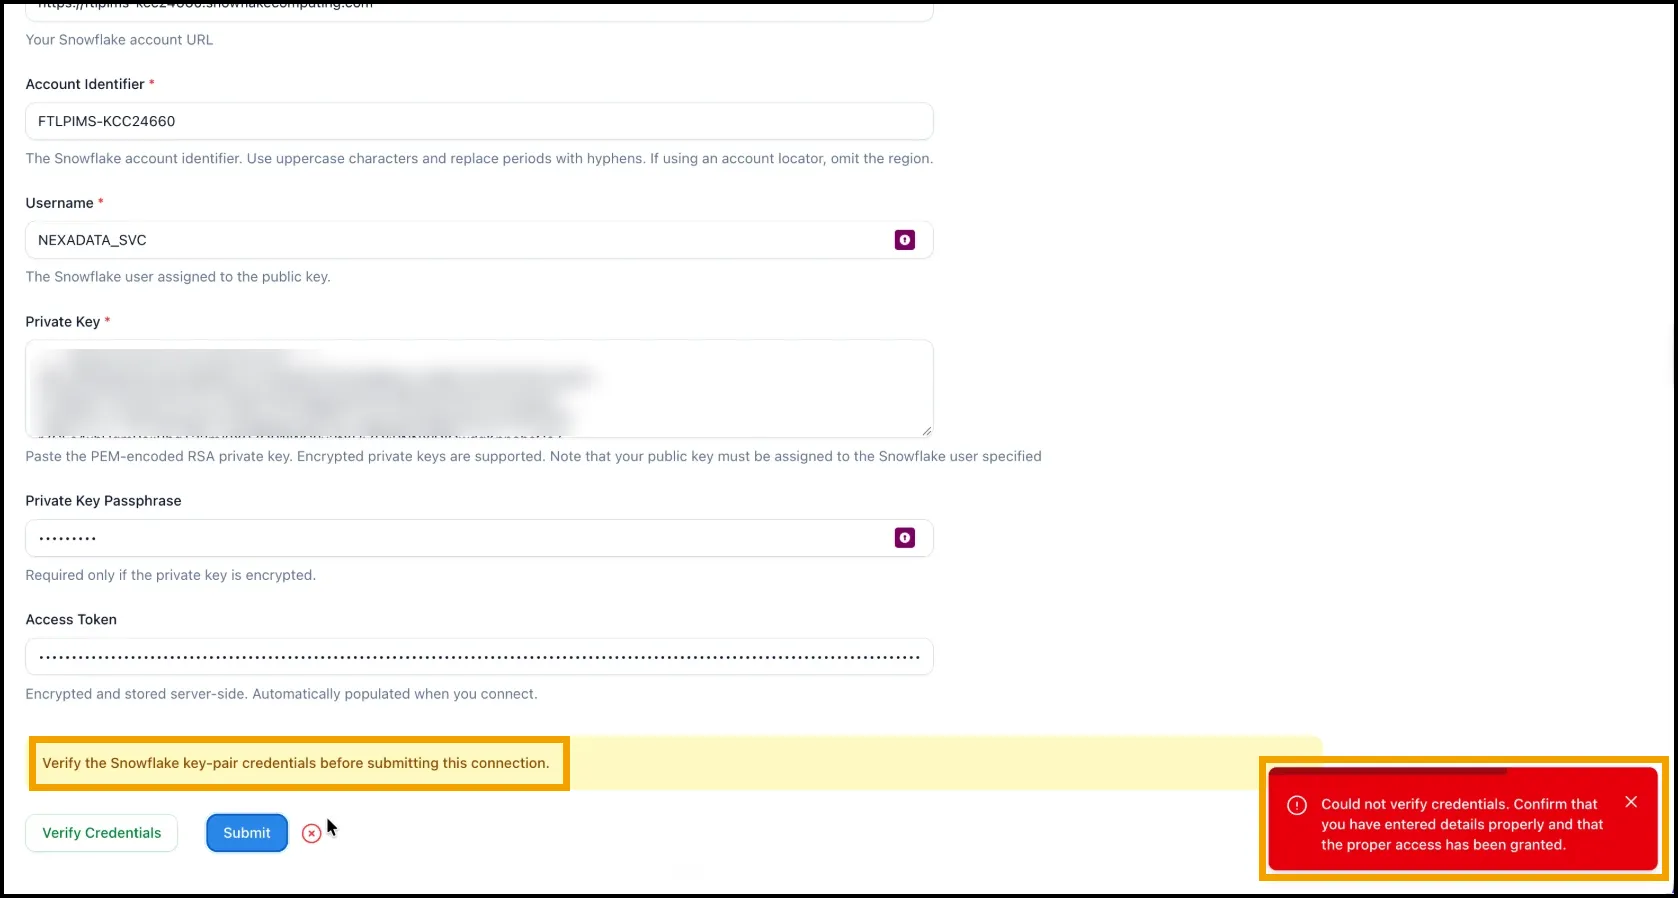
Cause: One of the Key-pair details does not match what Snowflake has.
Fix: Check each of these in turn:
-
Private Key Passphrase: It must be the passphrase you chose when you generated the key.
-
Account Identifier: Uppercase, with periods replaced by hyphens, for example
MYORGANIZATION-MYACCOUNT. If you use an account locator, leave off the region. -
Private Key: The whole file, including the
-----BEGIN ENCRYPTED PRIVATE KEY-----and-----END ENCRYPTED PRIVATE KEY-----lines. -
Fingerprint: The public key on the Snowflake user must match your private key. Compare the fingerprints as described in Setting up a Snowflake Connection.
Issue 4: Snowflake Refuses the OAuth Role
Section titled “Issue 4: Snowflake Refuses the OAuth Role”What you see: Signing in to Snowflake fails with a role error, or the consent page names a different role than you expected.
Cause: The Role field is blank and the person’s default role is used, the role is not in the integration’s ALLOWED_ROLES_LIST, the role is not granted to the person, or the role is ACCOUNTADMIN or SECURITYADMIN, which Snowflake blocks for OAuth.
Fix: Enter the Nexadata role in Role, exactly as named in Snowflake, and have your admin confirm both grants: the role in ALLOWED_ROLES_LIST, and GRANT ROLE <ROLE> TO USER <SNOWFLAKE_USERNAME>.
Issue 5: Connection Not Saved After Signing In
Section titled “Issue 5: Connection Not Saved After Signing In”What you see: You clicked Connect to Snowflake and signed in, but the connection is not in the Connections list.
Cause: The connection is saved only when you click Submit. Leaving the page after signing in discards it.
Fix: Create the connection again, and click Submit after the form shows Snowflake is connected.
Part 2: Issues with Creating a Dataset
Section titled “Part 2: Issues with Creating a Dataset”Issue 6: Database Does Not Exist or Not Authorized
Section titled “Issue 6: Database Does Not Exist or Not Authorized”What you see: A Workflow run fails with “The external service rejected the request (422 Unprocessable Content). SQL compilation error: Database ‘FINANCE’ does not exist or not authorized. Your primary role PUBLIC or one of your secondary roles must have USAGE or any other privilege granted on DATABASE FINANCE.” The Dataset’s Define Columns step fails to load with the same Snowflake message.

Cause: The connection’s role cannot see the database. “Your primary role PUBLIC” means the connection fell back to Snowflake’s built-in PUBLIC role, usually because the Nexadata role was revoked from the user.
Fix: Have your Snowflake admin grant the role back, for example GRANT ROLE NEXADATA_ROLE TO USER NEXADATA_SVC;, and confirm the role has USAGE on the database and schema and SELECT on the table. Verify Credentials cannot catch this: it checks the sign-in only, so it still succeeds while the role is missing. The Warehouse list is a clue: the Nexadata warehouse disappears from it, although a Dataset that already uses it still shows it in the field.
Issue 7: Warehouse List Shows Warehouses You Did Not Grant
Section titled “Issue 7: Warehouse List Shows Warehouses You Did Not Grant”What you see: The Warehouse list includes warehouses such as SNOWFLAKE_LEARNING_WH or SYSTEM$STREAMLIT_NOTEBOOK_WH, which your admin never granted to the Nexadata role.
Cause: Nexadata lists exactly the warehouses Snowflake shows the connection’s role, and Snowflake makes some warehouses visible to roles that were never granted them directly. Running SHOW WAREHOUSES as the Nexadata role in Snowflake returns the same list.
Fix: No fix is needed. Choose the warehouse your admin set up for Nexadata.
Issue 8: SQL Compilation Error on a Table or Column
Section titled “Issue 8: SQL Compilation Error on a Table or Column”What you see: Submitting a Dataset, or a query on a table Nexadata wrote, fails with a Snowflake SQL compilation error that names an object or a column, such as Object 'FINANCE.ACTUALS.BEVERAGE_SALE' does not exist or not authorized or invalid identifier 'PRODUCT_SKU'.
Cause: The name in the statement is misspelled, is not fully qualified, uses an example name from these guides such as FINANCE instead of your own, uses the wrong case inside double quotes, or the role lacks SELECT on the table. For a table Nexadata created, invalid identifier usually means a lowercase column name: Nexadata keeps the case of the Output Schema, so a column named product_sku in Nexadata is a lowercase column in Snowflake.
Fix: Use the full DATABASE.SCHEMA.TABLE name with your own database and schema, check the spelling, and confirm the role has SELECT on the table. Names created in double quotes must be written exactly as created, in double quotes. For lowercase columns in a table Nexadata wrote, quote them, for example SELECT "month", "product_sku" FROM ..., or rename the columns to uppercase in the Pipeline before the first run creates the table. See How Nexadata Writes to Snowflake.
Issue 9: Loaded Table Has Columns Named c1 to c7
Section titled “Issue 9: Loaded Table Has Columns Named c1 to c7”What you see: A table you loaded with Snowsight’s Load data into a Table has columns named c1, c2, and so on, its first row holds the column names, and every column is text.
Cause: Snowsight’s loader treats the header line as data unless you change its file format options.
Fix: Load the file again. Before clicking Load, click View options under File format and set Header to First line contains header. See Use Case: Round Trip Between Snowflake and Nexadata.
Part 3: Issues with Sending Data Back to Snowflake
Section titled “Part 3: Issues with Sending Data Back to Snowflake”Issue 10: Run Fails Because Columns Do Not Match the Table
Section titled “Issue 10: Run Fails Because Columns Do Not Match the Table”What you see: The run fails at the Delivering Output stage, and the output’s status is Errored with a message such as: “The workflow output has columns that are not in “FINANCE”.”PLANNING”.”BEVERAGE_SALES”: DATAX. Enable “Allow new columns” or add the columns to the target table. The workflow output is missing columns that are in “FINANCE”.”PLANNING”.”BEVERAGE_SALES”: AMOUNT. Add the columns to the workflow output before writing.”
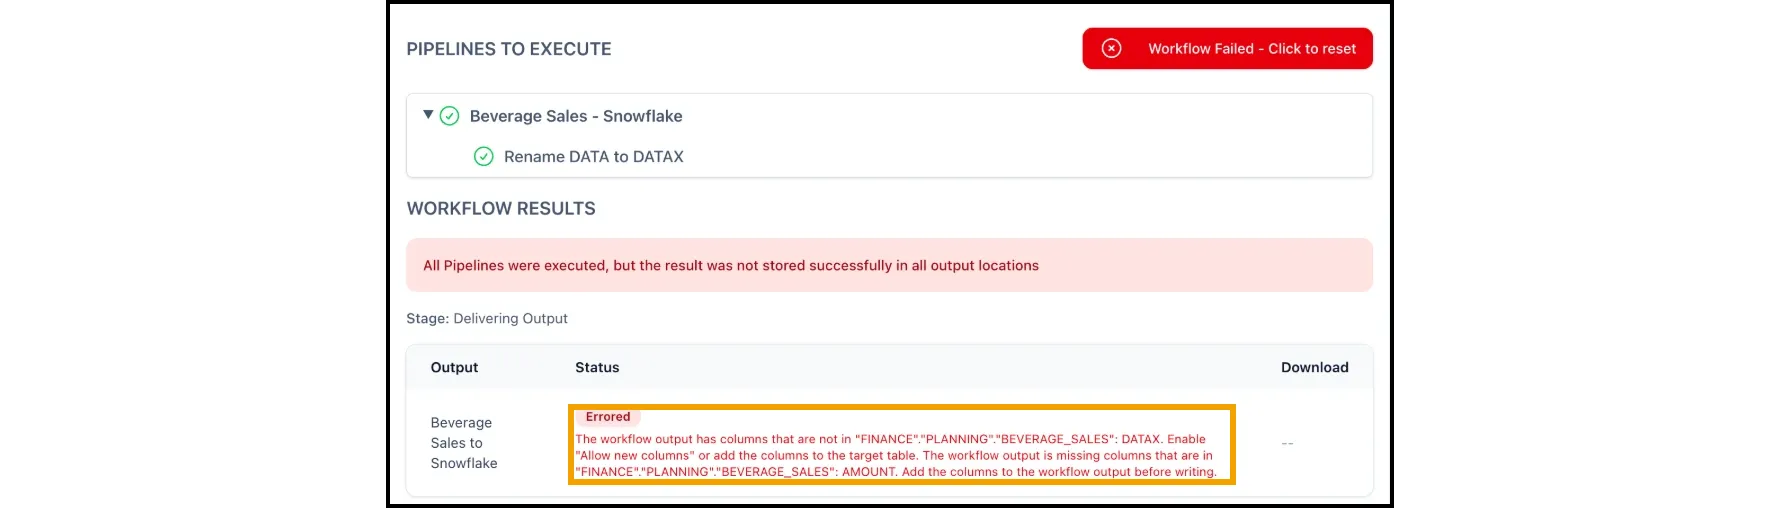
Cause: Allow new columns is off, and the Workflow output and the table do not have the same columns. Often a column was renamed in the Pipeline. Nothing is written to the table.
Fix: If the change is intended, turn on Allow new columns so Nexadata adds the new column to the table. If it is not, fix the Pipeline so its columns match the table. A column that is in the table but missing from the output must be added to the output either way.
Issue 11: Could Not Create, Overwrite, or Add Columns to the Table
Section titled “Issue 11: Could Not Create, Overwrite, or Add Columns to the Table”What you see: The run fails with a message that starts “Could not create”, “Could not overwrite”, “Could not add columns to”, or “Could not create the staging table for”, followed by the table name, the privilege the connection needs, and “Snowflake said:” with Snowflake’s own error.
Cause: The connection’s role is missing a privilege on the target schema or table:
| Message starts with | Grant the role |
|---|---|
| Could not create … | CREATE TABLE on the schema |
| Could not create the staging table … | CREATE TABLE on the schema |
| Could not overwrite … | TRUNCATE on the table |
| Could not add columns to … | Ownership of the table |
| Could not upsert into … (permissions) | INSERT, UPDATE, and DELETE on the table |
Fix: Have your Snowflake admin run the grant. For tables that existed before the Nexadata role had OWNERSHIP on future tables, the admin can transfer ownership with GRANT OWNERSHIP ON TABLE <DATABASE>.<SCHEMA>.<TABLE> TO ROLE NEXADATA_ROLE COPY CURRENT GRANTS;.
Issue 12: Upsert Fails Because Business Keys Are Not Unique
Section titled “Issue 12: Upsert Fails Because Business Keys Are Not Unique”What you see: The run fails with “Could not upsert into … The business key columns do not uniquely identify rows in the workflow output.”
Cause: Two or more rows in the Workflow output have the same values in the Business Key Columns, so Snowflake cannot tell which one should update the table.
Fix: Add columns to the business key until it identifies each row uniquely, or remove the duplicate rows in the Pipeline, for example with a Group By.
Issue 13: Upsert Adds Rows Instead of Updating Them
Section titled “Issue 13: Upsert Adds Rows Instead of Updating Them”What you see: The row count grows on every run even though the Write Mode is Upsert.
Cause: The business key includes a column whose value changes between runs, such as an amount or a generated ID, so rows no longer match.
Fix: Remove that column from Business Key Columns, keeping only the columns that identify a row. To clean up existing duplicates, filter on NEXADATA_RUN_ID to find the rows each run inserted.
General Best Practices
Section titled “General Best Practices”-
Start with a test schema. Point your first outputs at a sandbox schema before writing to production tables.
-
Use one role and one service user per purpose. A dedicated role and service user for Nexadata make its grants easy to review and revoke.
-
Track refresh token expiry. Note when OAuth connections will need re-authorizing, and re-authorize before scheduled runs depend on them.
-
Use the run ID. Filter on
NEXADATA_RUN_IDto find exactly which rows a given run inserted or updated.