

Setting up a Snowflake Connection
Snowflake is a cloud data platform where many finance and operations teams keep their actuals, plans, and reference data. Nexadata integrates directly with Snowflake in both directions: you can read the results of a SQL statement into a Nexadata Dataset, transform and harmonize it, and write the results back to a Snowflake table.
Here are the key features:
-
SQL reads on your warehouse: A Dataset runs your own SQL statement on a Snowflake warehouse you choose, so you can filter, join, and aggregate before any data moves.
-
Write-back to Snowflake tables: Send Workflow outputs to a Snowflake table with Append, Upsert, or Overwrite. Amounts keep their decimal precision, so totals tie to the cent.
-
Two authentication types: Connect as a person with OAuth, or as a dedicated service user with a Key-pair. Neither one stores a Snowflake password in Nexadata.
-
Secure credential storage: Secrets, keys, and tokens are encrypted and stored server-side.
Snowflake has no settings screen for this kind of setup. Instead, a Snowflake admin runs a few SQL statements once per Snowflake account, and this article gives you each one to copy and paste. Parts 1 and 2 are usually completed with your Snowflake admin, who needs the SECURITYADMIN or ACCOUNTADMIN role. Part 3 takes place in Nexadata.
Part 1: Choose an Authentication Type
Section titled “Part 1: Choose an Authentication Type”A Snowflake connection uses one of two authentication types. Both can read and write.
| Authentication type | Who Nexadata acts as | How it signs in | Best for |
|---|---|---|---|
| OAuth | The Snowflake user who signs in | You sign in to Snowflake once and approve access | Teams that want every action tied to a named user |
| Key-pair | A service user created for Nexadata | Nexadata signs each request with a private key; nobody signs in | Scheduled, unattended Workflows |
OAuth connects Nexadata as a real Snowflake user. Your admin creates an OAuth integration, an entry that tells Snowflake that Nexadata is allowed to ask users for access. When you click Connect to Snowflake, you sign in to Snowflake yourself and approve the request, the same way you might allow an app to use your Google account. Nexadata then acts as you, with the role you approved, and every query is recorded under your name. Snowflake also gives Nexadata a refresh token, which lets your scheduled Workflows keep running without asking you to sign in again until the token expires.
Key-pair connects Nexadata as a service user: a Snowflake user made for an application rather than a person. It has no password and cannot sign in through a browser. Instead, your admin creates a pair of matching keys. The public key is stored on the Snowflake user, and the private key is pasted into Nexadata. Snowflake trusts a request only when it is signed with the private key that matches. Because no person signs in, the connection keeps working when people change roles or leave.
Both authentication types need the same two things in Snowflake:
-
A role that holds exactly the privileges Nexadata needs. In Snowflake, privileges are granted to roles, and roles are granted to users.
-
A warehouse that role can use. A warehouse is the compute that runs queries and loads, and it is billed while it runs.
Part 2: Prepare Snowflake
Section titled “Part 2: Prepare Snowflake”Run these statements in a Snowsight worksheet as a user with SECURITYADMIN or ACCOUNTADMIN. Replace the placeholders in angle brackets with your own names. The examples use the role NEXADATA_ROLE and the warehouse NEXADATA_WH; you can keep those names or choose your own.
Step 1: Create the Role, Warehouse, and Grants
Section titled “Step 1: Create the Role, Warehouse, and Grants”This step is the same for both authentication types. It gives Nexadata read access to the schema it reads from, and write access to the schema it writes to, and nothing else.
-- 1. A role for NexadataUSE ROLE SECURITYADMIN;CREATE ROLE IF NOT EXISTS NEXADATA_ROLE;GRANT ROLE NEXADATA_ROLE TO ROLE SYSADMIN;
-- 2. A warehouse for Nexadata (skip if you will use an existing one)USE ROLE SYSADMIN;CREATE WAREHOUSE IF NOT EXISTS NEXADATA_WH  WAREHOUSE_SIZE = 'XSMALL'  AUTO_SUSPEND = 60  AUTO_RESUME = TRUE;
-- 3. GrantsUSE ROLE SECURITYADMIN;GRANT USAGE ON WAREHOUSE NEXADATA_WH TO ROLE NEXADATA_ROLE;GRANT USAGE ON DATABASE <DATABASE> TO ROLE NEXADATA_ROLE;
-- Read: the schema Nexadata reads fromGRANT USAGE ON SCHEMA <DATABASE>.<SOURCE_SCHEMA> TO ROLE NEXADATA_ROLE;GRANT SELECT ON ALL TABLES IN SCHEMA <DATABASE>.<SOURCE_SCHEMA> TO ROLE NEXADATA_ROLE;GRANT SELECT ON FUTURE TABLES IN SCHEMA <DATABASE>.<SOURCE_SCHEMA> TO ROLE NEXADATA_ROLE;
-- Write: the schema Nexadata writes toGRANT USAGE, CREATE TABLE, CREATE STAGE ON SCHEMA <DATABASE>.<TARGET_SCHEMA> TO ROLE NEXADATA_ROLE;GRANT SELECT, INSERT, UPDATE, DELETE, TRUNCATE ON ALL TABLES IN SCHEMA <DATABASE>.<TARGET_SCHEMA> TO ROLE NEXADATA_ROLE;GRANT OWNERSHIP ON FUTURE TABLES IN SCHEMA <DATABASE>.<TARGET_SCHEMA> TO ROLE NEXADATA_ROLE;
Here is what each piece does, in business terms:
| Grant | Why Nexadata needs it |
|---|---|
USAGE on the warehouse | To run queries and loads. Without it, the warehouse does not appear in Nexadata. |
USAGE on the database and schemas | To see that they exist. Snowflake hides anything a role has no access to. |
SELECT on the source tables | To read data into Datasets. FUTURE TABLES covers tables added to the schema later. |
CREATE TABLE on the target schema | To create a target table for you, and to create the temporary table an Upsert uses. |
CREATE STAGE on the target schema | To upload a run’s rows to Snowflake before loading them into the table. |
INSERT, UPDATE, DELETE, TRUNCATE | To add rows (Append), update rows in place (Upsert), and replace a table’s rows (Overwrite). |
OWNERSHIP on future tables in the target schema | So that tables created in this schema later belong to the Nexadata role, which can then load them and add columns. |
To keep Nexadata read-only, grant only the warehouse, database, and source schema lines. Your admin can also narrow SELECT to specific tables instead of a whole schema.
Then complete Option A for OAuth or Option B for Key-pair.
Option A: Create an OAuth Integration
Section titled “Option A: Create an OAuth Integration”-
Give the role to each person who will sign in from Nexadata:
USE ROLE SECURITYADMIN;GRANT ROLE NEXADATA_ROLE TO USER <SNOWFLAKE_USERNAME>; -
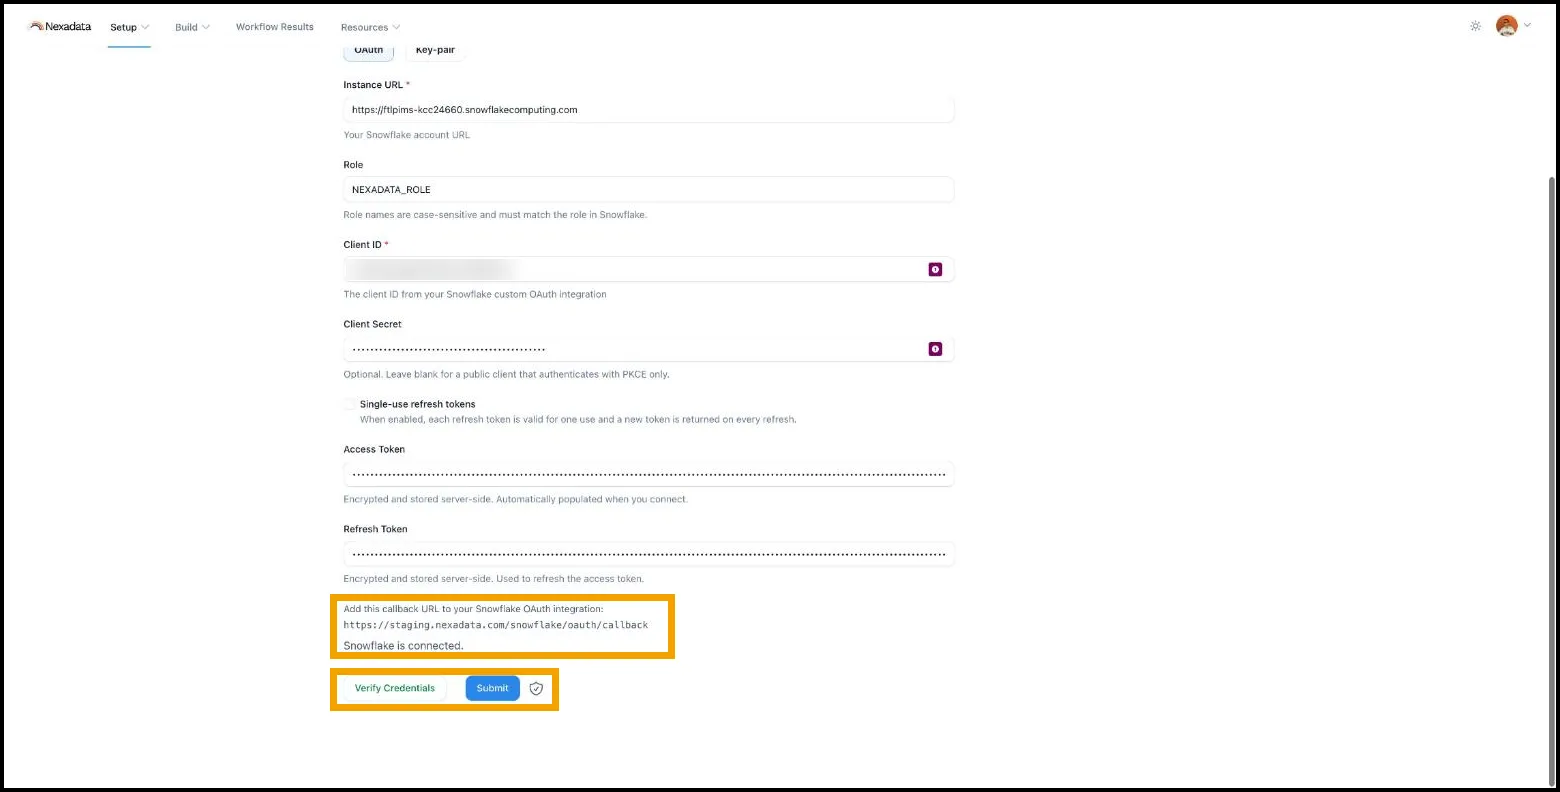
In Nexadata, start a new Snowflake connection with OAuth selected (see Part 3). Below the form, Nexadata shows the line “Add this callback URL to your Snowflake OAuth integration:” followed by the URL. Copy that URL exactly. Snowflake rejects the sign-in if it does not match.
-
Create the integration. The integration’s name is what people see on the Snowflake sign-in and consent screens (“Sign in to Snowflake to continue to …”), so choose a name a business user will recognize, such as
NEXADATA_FINANCE_OAUTH.For a confidential client, which uses a Client ID and a Client Secret:
USE ROLE ACCOUNTADMIN;CREATE SECURITY INTEGRATION NEXADATA_FINANCE_OAUTHTYPE = OAUTHENABLED = TRUEOAUTH_CLIENT = CUSTOMOAUTH_CLIENT_TYPE = 'CONFIDENTIAL'OAUTH_REDIRECT_URI = '<CALLBACK URL FROM THE NEXADATA FORM>'OAUTH_ISSUE_REFRESH_TOKENS = TRUEOAUTH_REFRESH_TOKEN_VALIDITY = 7776000ALLOWED_ROLES_LIST = ('NEXADATA_ROLE');For a public client, which uses a Client ID only and proves its identity with PKCE instead of a secret, change one line:
OAUTH_CLIENT_TYPE = 'PUBLIC'What the settings mean:
-
OAUTH_ISSUE_REFRESH_TOKENS = TRUElets Nexadata renew its access without asking you to sign in again, so scheduled Workflows keep running. -
OAUTH_REFRESH_TOKEN_VALIDITY = 7776000keeps a sign-in valid for 90 days (the value is in seconds). After that, someone must re-authorize the connection in Nexadata. A shorter value, such as86400(one day), means signing in again every day. -
ALLOWED_ROLES_LISTlimits the integration to the Nexadata role, so a sign-in can never use a more powerful role.
-
-
Copy the Client ID and Client Secret. This query returns them as two rows, one value per row, ready to copy:
WITH secrets AS (SELECT PARSE_JSON(SYSTEM$SHOW_OAUTH_CLIENT_SECRETS('NEXADATA_FINANCE_OAUTH')) AS j)SELECT 'Client ID' AS field, j:OAUTH_CLIENT_ID::STRING AS value FROM secretsUNION ALLSELECT 'Client Secret', j:OAUTH_CLIENT_SECRET::STRING FROM secrets;For a public client, you need only the Client ID.
Option B: Create a Key-pair Service User
Section titled “Option B: Create a Key-pair Service User”The commands below run in a terminal on macOS or Linux, or in Git Bash on Windows. They use openssl, which is already installed on macOS and most Linux systems.
-
Generate an encrypted private key. You are asked for a passphrase; choose a strong one and store it in your password manager.
Terminal window openssl genrsa 2048 | openssl pkcs8 -topk8 -v2 des3 -inform PEM -out rsa_key.p8rsa_key.p8is the private key. It goes into Nexadata and nowhere else. -
Create the matching public key from it. You are asked for the passphrase again.
Terminal window openssl rsa -in rsa_key.p8 -pubout -out rsa_key.pub -
Copy the public key without its first and last lines, as one line of text:
Terminal window grep -v "PUBLIC KEY" rsa_key.pub | tr -d '\n' | pbcopypbcopyputs the result on the clipboard on macOS. On Linux or Git Bash, leave off| pbcopyand copy the printed line instead. -
In Snowflake, create the service user with the public key, and give it the role:
USE ROLE SECURITYADMIN;CREATE USER NEXADATA_SVCTYPE = SERVICEDEFAULT_ROLE = NEXADATA_ROLEDEFAULT_WAREHOUSE = NEXADATA_WHRSA_PUBLIC_KEY = '<PASTE THE PUBLIC KEY LINE HERE>'COMMENT = 'Nexadata connector (key-pair only)';GRANT ROLE NEXADATA_ROLE TO USER NEXADATA_SVC;TYPE = SERVICEmeans the user has no password and cannot sign in through a browser. TheGRANT ROLEline is required:DEFAULT_ROLEnames the role Nexadata uses for this connection, but it grants nothing on its own. A Key-pair connection has no Role field, so the default role must be the Nexadata role. -
Confirm that Snowflake holds the right key by comparing fingerprints. First, compute the fingerprint of your public key:
Terminal window openssl rsa -pubin -in rsa_key.pub -outform DER | openssl dgst -sha256 -binary | openssl enc -base64
Then, in Snowflake, show the fingerprint stored on the user:
USE WAREHOUSE NEXADATA_WH;DESC USER NEXADATA_SVC;SELECT "property", "value"FROM TABLE(RESULT_SCAN(LAST_QUERY_ID()))WHERE "property" LIKE 'RSA_PUBLIC_KEY%';The value of
RSA_PUBLIC_KEY_FPafterSHA256:must match the terminal output exactly.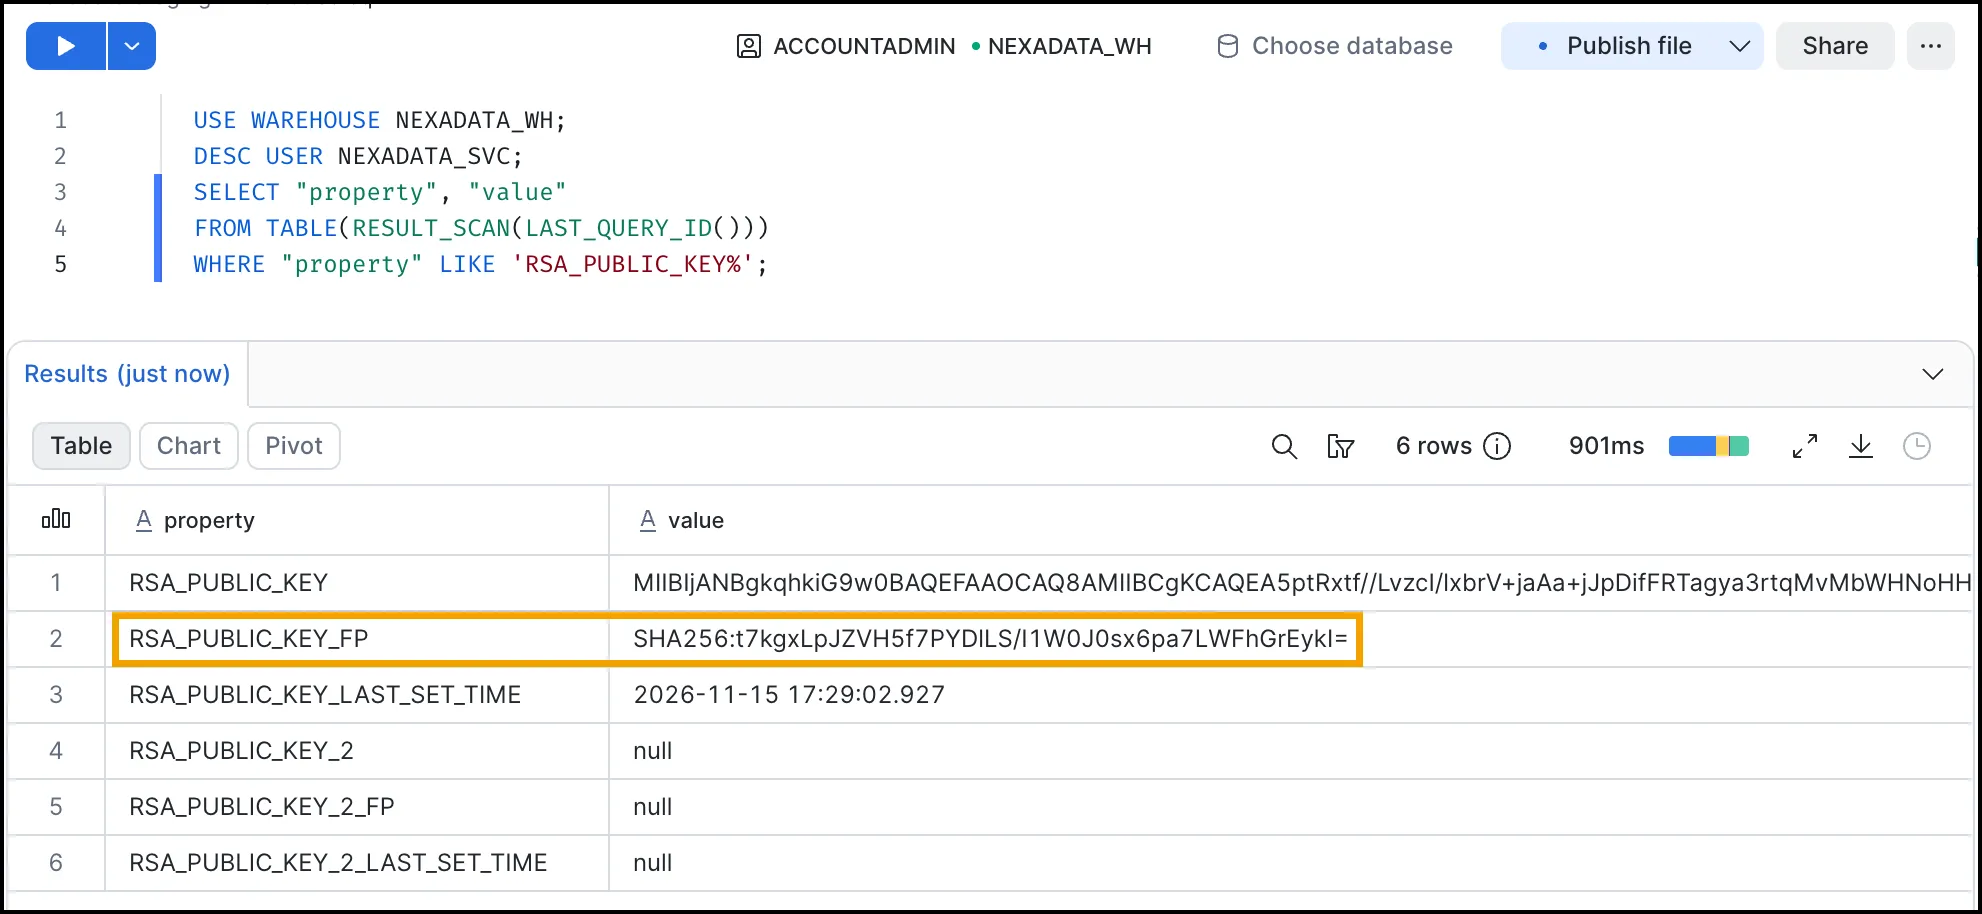
Part 3: Create the Connection in Nexadata
Section titled “Part 3: Create the Connection in Nexadata”Step 1: Add a Connection
Section titled “Step 1: Add a Connection”-
From the Nexadata home screen, click New Connection in the Quick Actions panel, or go to Setup → Connections and click Create Connection in the upper-right corner.
-
In the Create New Connection form:
-
Enter a unique Name for your Snowflake connection.
-
Select Snowflake as the Connection Type.
-
-
Under Authentication Type, select OAuth or Key-pair.
Step 2: Enter the Credentials
Section titled “Step 2: Enter the Credentials”For OAuth, enter the details from Option A:
-
Instance URL: Your Snowflake account URL, for example
https://myorg-account.snowflakecomputing.com. -
Role: The role from Part 2, for example
NEXADATA_ROLE. The form marks it optional, but fill it in: if it is blank, Snowflake uses the person’s default role, and OAuth blocks sign-ins with ACCOUNTADMIN or SECURITYADMIN. Role names are case-sensitive and must match the role in Snowflake. -
Client ID: The Client ID of the OAuth integration.
-
Client Secret: The Client Secret of a confidential integration. Leave it blank for a public client that authenticates with PKCE only.
-
Single-use refresh tokens: Leave this unchecked unless your Snowflake admin set the integration to require single-use refresh tokens. When it is checked, each refresh token is valid for one use and Snowflake returns a new one on every refresh.
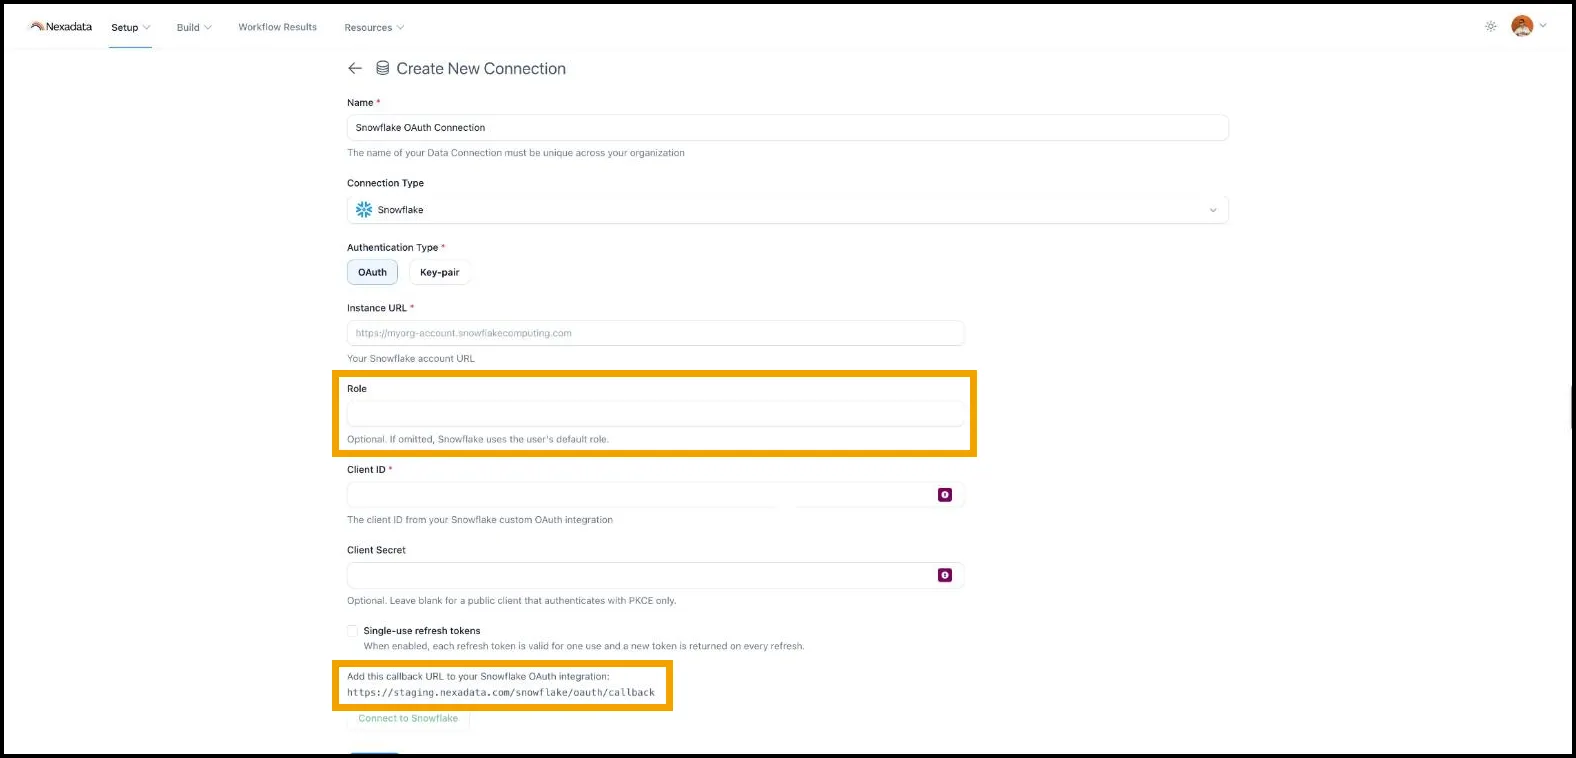
For Key-pair, enter the details from Option B:
-
Instance URL: Your Snowflake account URL.
-
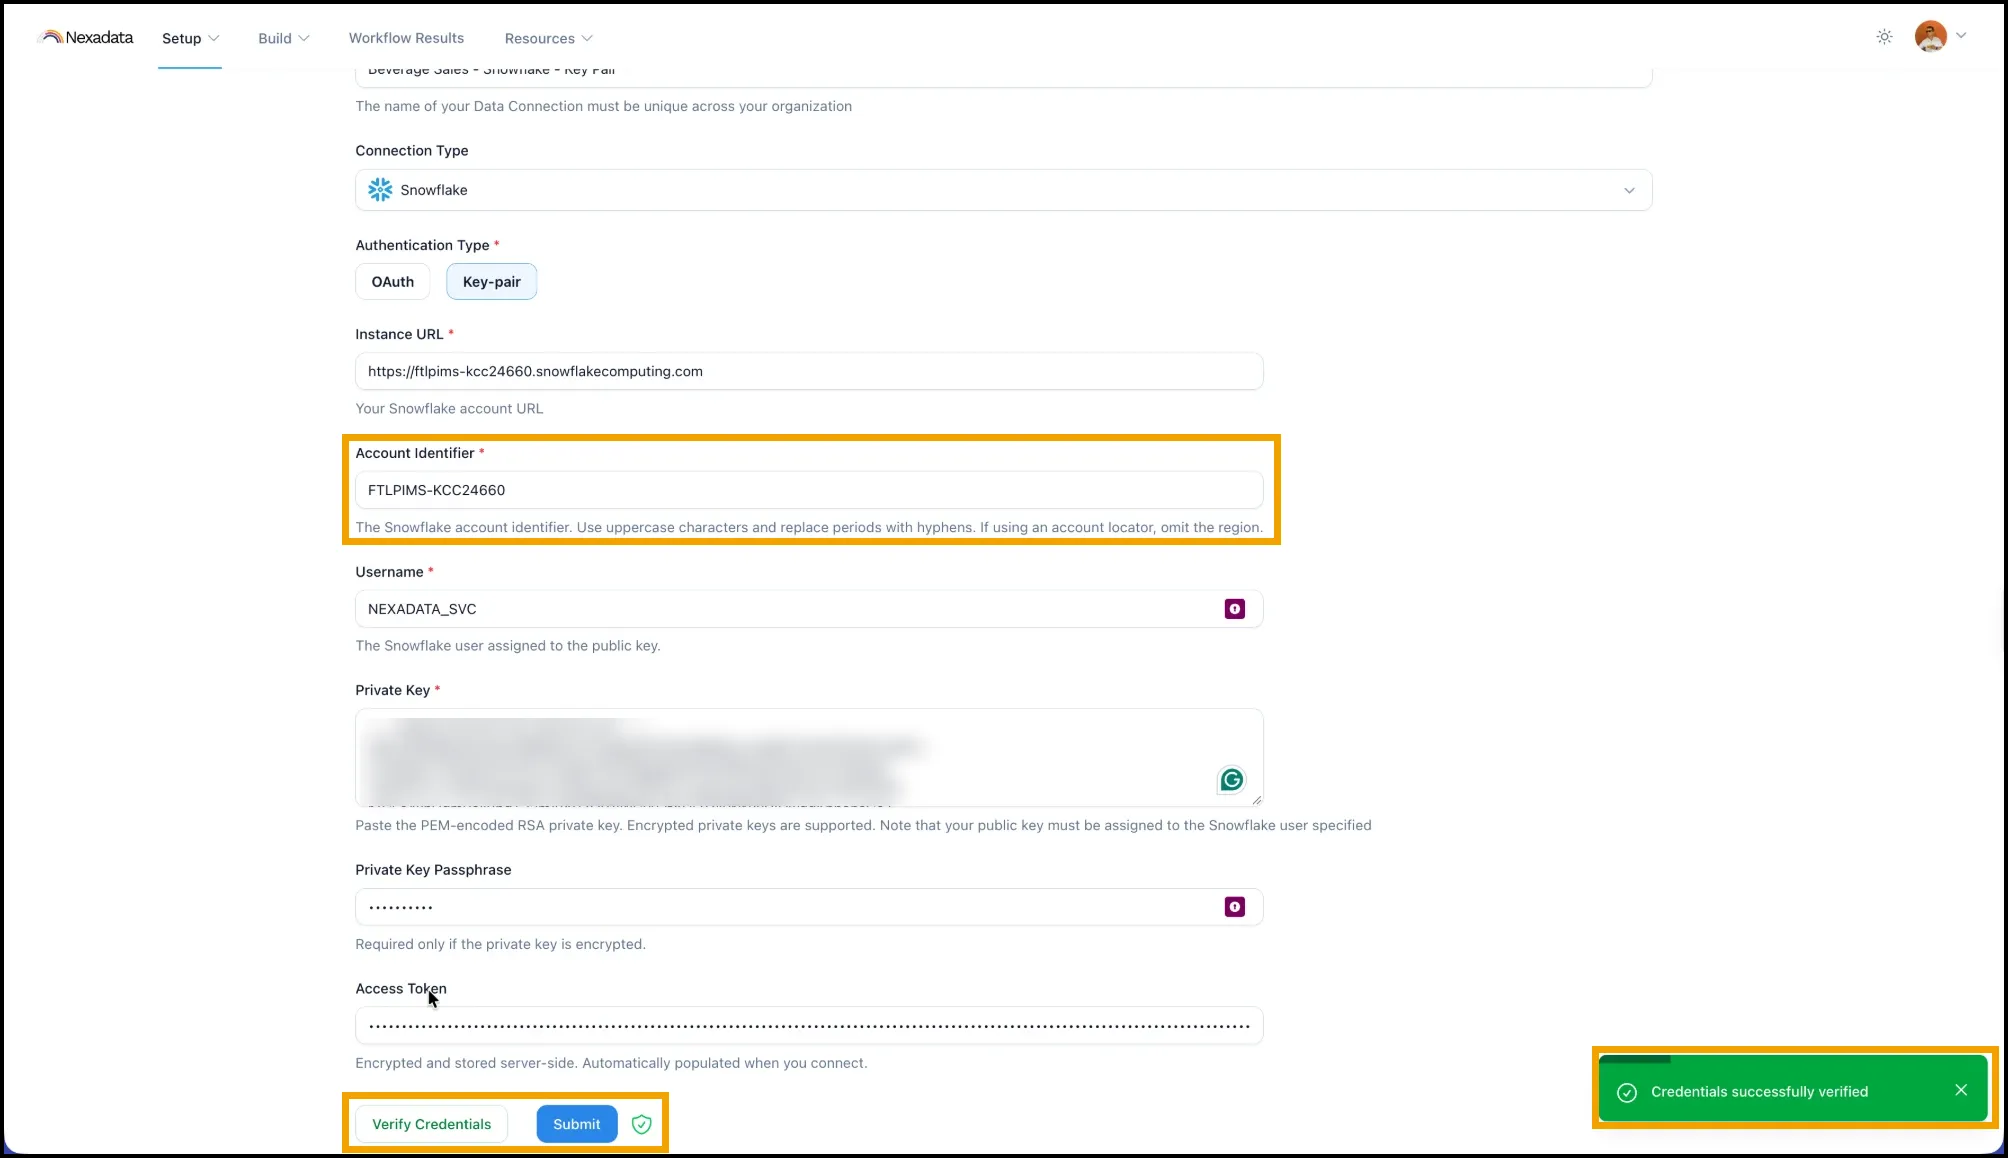
Account Identifier: Your account identifier in uppercase, with any periods replaced by hyphens, for example
MYORGANIZATION-MYACCOUNT. If you use an account locator, leave off the region. -
Username: The service user, for example
NEXADATA_SVC. -
Private Key: Open
rsa_key.p8in a text editor and paste its entire contents, including the-----BEGIN ENCRYPTED PRIVATE KEY-----and-----END ENCRYPTED PRIVATE KEY-----lines. -
Private Key Passphrase: The passphrase you chose in Option B. It is required only if the private key is encrypted.
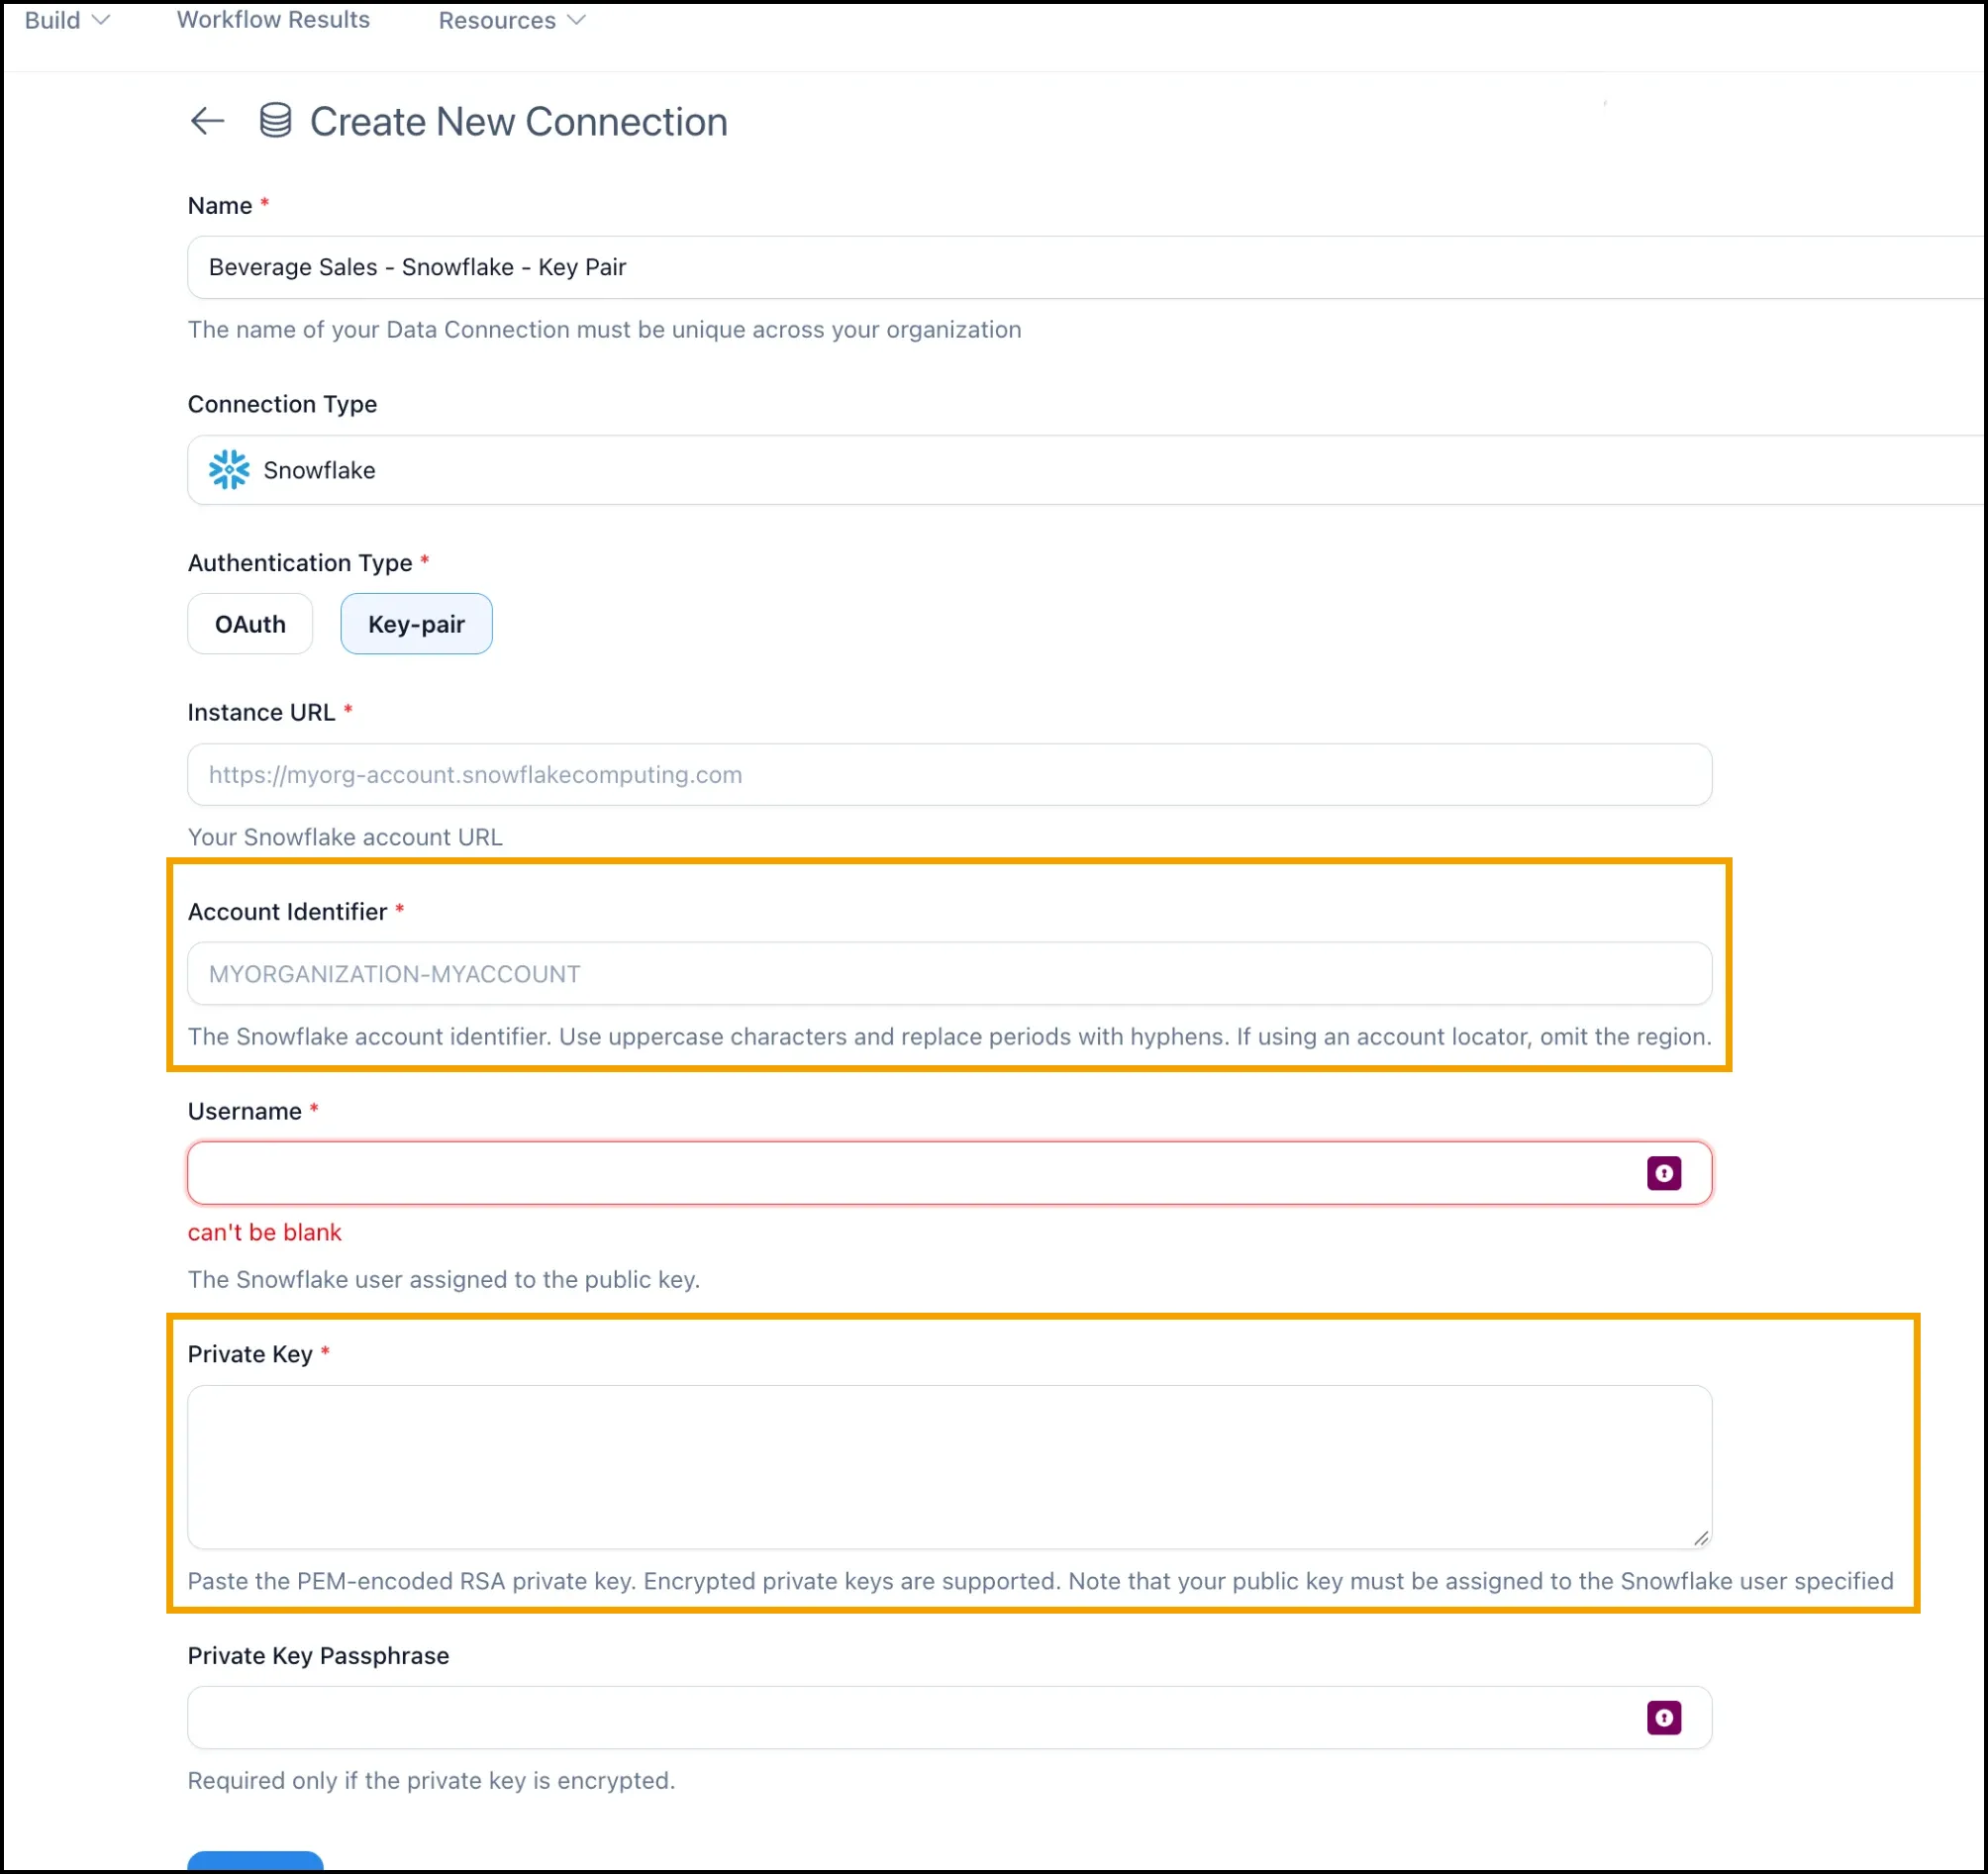
Step 3: Authorize or Verify
Section titled “Step 3: Authorize or Verify”For OAuth, connect to Snowflake:
-
Click Connect to Snowflake. The button is available once the required fields are filled in.
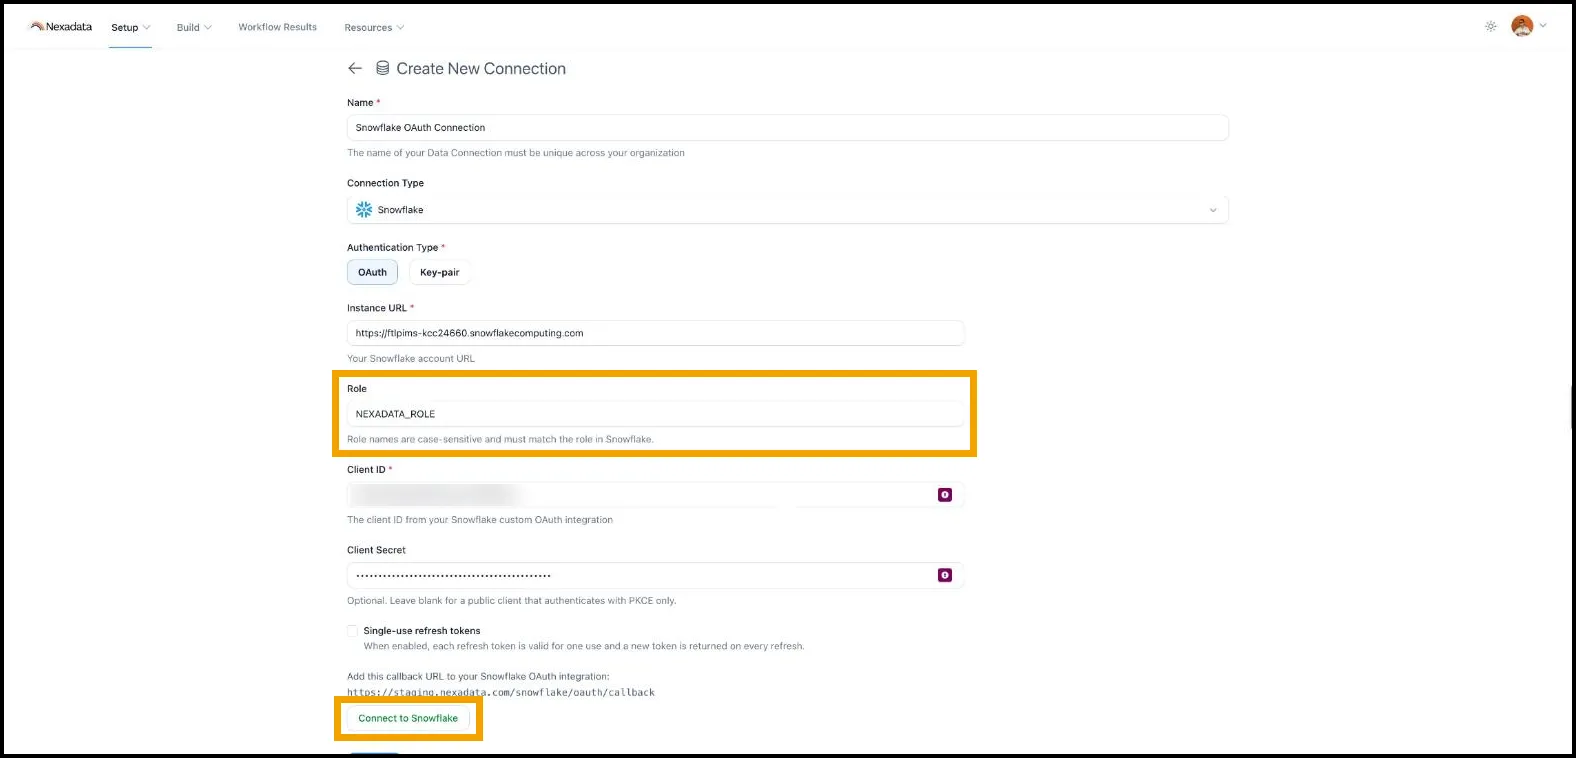
-
A new browser tab opens with the Snowflake sign-in page, which names your integration. Sign in with your Snowflake username and password. This page appears even if you are already signed in to Snowsight, because Snowsight and the account sign-in use separate sessions.

-
Snowflake shows what Nexadata is asking for: access to your account using the Nexadata role, access to your data, and permission to run offline processes on your behalf. The last item is what lets scheduled Workflows run while you are away. Click Allow.

-
The tab shows “SUCCESS! You may now close this window and navigate back to Nexadata.” Close the tab yourself and return to the Nexadata tab.

-
The form now shows Snowflake is connected., and the Access Token and Refresh Token fields are filled in and masked. Nexadata stores both tokens encrypted and renews the access token automatically.
For Key-pair, click Verify Credentials. Nexadata signs a request with your private key and checks it with Snowflake. When it succeeds, a “Credentials successfully verified” message appears and a green shield appears next to Submit.
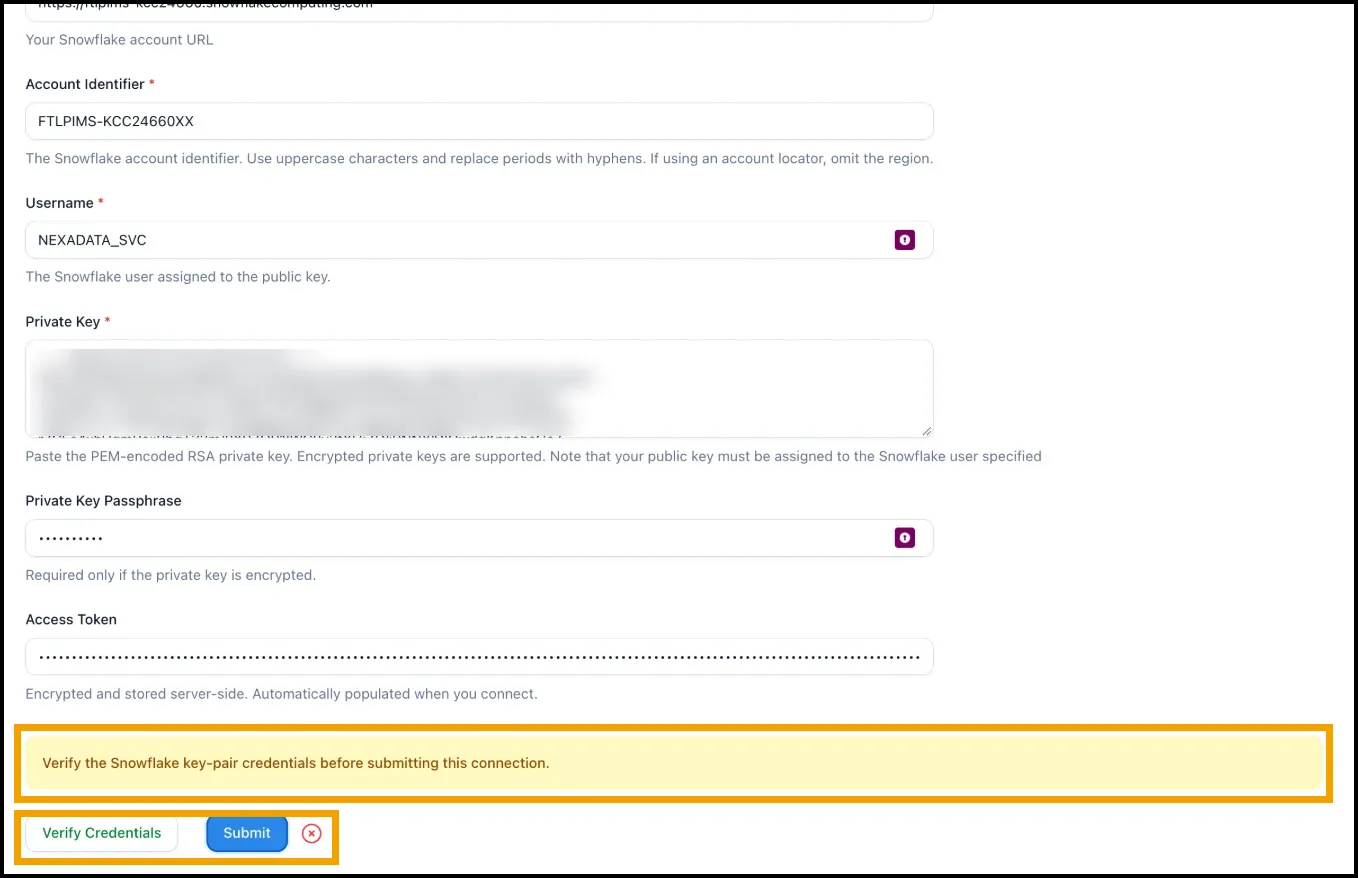
If you click Submit before a successful verification, Nexadata does not save the connection and shows “Verify the Snowflake key-pair credentials before submitting this connection.”
Step 4: Submit
Section titled “Step 4: Submit”Click Submit to save the connection.
Troubleshooting Tips
Section titled “Troubleshooting Tips”-
OAuth sign-in fails or Snowflake reports a redirect mismatch? The integration’s
OAUTH_REDIRECT_URImust match the callback URL shown on the Nexadata form exactly. Copy it from the form again. -
Snowflake refuses the role during sign-in? Check that the Role field matches the role name exactly, that the role is in the integration’s
ALLOWED_ROLES_LIST, and that the role is granted to the person signing in. ACCOUNTADMIN and SECURITYADMIN cannot be used with OAuth. -
Key-pair verification fails? Check the passphrase, the Account Identifier format, that the whole private key was pasted including its first and last lines, and that the fingerprints match.
For more, see Troubleshooting the Snowflake Connector.